[EDIT April 2016: This series of blog posts expanded into a huge series of 46 posts. Up till this one, I have been making the smalls to go in the box. From now on, I describe how to make the box itself. Please see the final blog post for a list of hints and tips for making this workbox.]
I am currently stitching the ‘Strawberry side’ of the Home Sweet Home workbox, designed by Carolyn Pearce. I stitched the main stem first, in Knotted pearl stitch, using Perle 12 thread, which makes a nice strong knot for each stitch. I deliberately spaced out the stitches as I worked from top to bottom, so that the stem gets wider lower down.
Next, to embroider the ripe strawberries, I padded the shapes by first working split backstitch around the outlines, then working two layers of Satin stitch across each shape, inside the backstitched outlines (one layer at right angles to the other).
Then, starting from the top of the strawberry, I worked Long and short stitch using a variegated silk thread, covering the backstitched outline as I went. I also started to stitch the white strawberry flower in the same way.
The unripe strawberry on the left hand side was stitched in three shades of very pale pink, in French knots using two wraps each time. I found it easier to work an outer ring of knots first, to define the shape, and then fill it in – otherwise, the shape has a tendency to just keep getting bigger!
The leaves are stitched in three shades of green, in the same way as the strawberries and flower, but without the padding first – backstitched outline, then Long and short stitch filling, from the outside in.
The highlights on the strawberry flower are made using pale green silk – straight stitches between the petals to define them, then several fanned out straight stitches from the centre outwards on each petal itself. Three French knots in yellow fill the centre.
The leaves behind the flower are worked in Leaf stitch, in very dark green Anchor stranded cotton.
The sepals for the ripe strawberries are worked in Picot stitch, and for the unripe strawberry they are Lazy daisy stitches in dark green, with a gold highlight added last.
The little bee charm is from a packet that I bought on Ebay several years ago – very small, dainty ones, that were very cheap I seem to remember, but I can’t remember exactly who I bought them from!
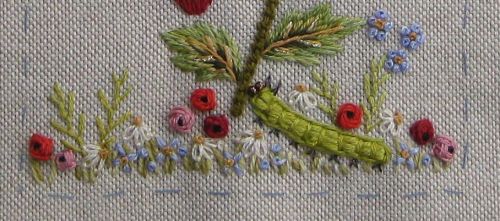
The meadow flowers along the bottom edge are similar to the ones on the ‘smalls’. The anemones are Raised cross stitches with a black French knot in the centre. The daisies are three individual Lazy daisy stitches, with a gold French knot highlight, and the forget-me-nots are Granitos stitches in variegated blue silk with a French knot centre. The three blue flowers above the caterpillar are supposed to be blue feature buttons, according to Carolyn Pearce’s instructions in her book, but I couldn’t find those to buy, so I improvised. The caterpillar itself is made from three thick threads of variegated silk, couched down with one strand of the same thread, and then Stem stitch worked around the outer edge. The eyes are bronze colour seed beads, and the legs and antennae are gunmetal metallic thread.
Here’s the completed panel:
~~~~~~~~~~~~~~~~~~~~~~~~~~~~~~~~~~


This is delightful! There are so many little details to observe. I love the little bee charms and all the little bugs and flowers. 🙂
It is looking great and is inspiring me to start on my version of the whole set . I often page through the book and think out my way of doing it. One member of our guild has finished the whole set and it looks great.
How fun and what progress! Thanks for sharing your great photos with us.
Beautiful job on this piece!
What a beautiful start! I love your strawberries and the cheeky caterpillar