Carolyn Pearce Home Sweet Home workbox 6: embroidering the sides of the spool holder

I’ve been embroidering the side panel of the spool holder (as part of the etui set that I am making) this week. This is not one of my designs, but is by Carolyn Pearce, from her book ‘Home Sweet Home Workbox’. I wish I had more time for this at the moment, but it’s just not possible! So, all I have done is one little flower. Still, it’s a very nice little flower.


Spool holder 3

It’s a cornflower, with the flower head worked in four shades of lilac / purple / pale blue straight stitches, radiating out from the centre. The very middle of the flower is closely-worked seed stitches done in very dark maroon, and old gold metallic thread for a bit of sparkle. The stem is chain stitch in a grass green shade of Gloriana thread (not sure of the thread name, as the label has fallen off!). The leaves are straight stitches in three shades of green.

Not much stitching, then, for a whole week (this flower is about an inch and a quarter high), but sometimes quality is better than quantity, and I’m pleased with how it has turned out.

~~~~~~~~~~~~~~~~~~~~~~~~~~~~~~~~~~

Dollhouse Needlepoint newsletter sign-up invitation


Carolyn Pearce Home Sweet Home workbox 5: starting the embroidery on the spool holder

This week I’ve started stitching the spool holder for the Carolyn Pearce ‘Home Sweet Home’ workbox (the design is from her book) – this is a beautiful little round box with wildflowers around the sides, and oranges stitched on the lid and base.

In her book, Carolyn suggests using a long-armed cross stitch for the oranges. When I tried that, mine came out very untidily, so I unpicked them and instead worked them in satin stitch, with a base layer of satin stitches laid in the opposite direction first, for padding, and a border of split stitch to define the outline (covered over with the final layer of satin stitches). The ‘ends’ of the oranges (is there a proper name for that bit?!) are little cross stitches worked in very dark brown, with one strand of Anchor thread.

This is the base of the spool holder:

Spoolholder 1

The top of the spoolholder has more oranges and leaves than the base, and an eyelet stitched in the centre, for the leading thread from the spool to be fed through, when the holder is completed. The leaves are worked in Vandyke stitch, in a variegated thread.

Spoolholder 2

I’m not sure that I pulled the thread tight enough when I was finishing the eyelet, so the hole isn’t very big, but I think it will work. The spool that I want to keep in this spoolholder is DMC number 12,  and that quality of thread is very fine, so I think it will work.

~~~~~~~~~~~~~~~~~~~~~~~~~~~~~~~~~~

Dollhouse Needlepoint newsletter sign-up invitation


A quick project: a new dollhouse sampler kit

I’ve been meaning to design more dollhouse samplers for a while now – this is the first of the new range that I’ve finished. It’s available as a kit (complete with the tiny wooden frame) on my website from today.

The dollhouse sampler kit called 'Blue vases', stitched on 32 count evenweave fabric, measures 1 7/8 x 2 1/4 inches
The dollhouse sampler kit called ‘Blue vases’, stitched on 32 count evenweave fabric, measures 1 7/8 x 2 1/4 inches

It only takes a couple of evenings of stitching, as it’s worked on 32 count evenweave fabric – so, unlike silk gauze, where you have to ‘fill in’ every hole on the fabric background, with evenweave, you only need to stitch the actual design. The fabric colour itself is left showing around the design, making it a quick project to complete.

blue-vases-closeup-cropped 900

The design is to be counted from a colour block chart. Clear instructions on how to finish the sampler, a suitable needle, a piece of 32 count ecru evenweave fabric, lots of Anchor stranded cotton and the wooden frame itself are also included in the kit. The design is called ‘Blue vases’, and is available on my website now, priced £8.95.

There is a tutorial on my website about how to complete one of these miniature sampler kits, so that you can see exactly how to make one before you commit yourself!

~~~~~~~~~~~~~~~~~~~~~~~~~~~~~~~~~~

Dollhouse Needlepoint newsletter sign-up invitation


Carolyn Pearce Home Sweet Home workbox 4: beaded edging on the pincushion

I was determined to get this pincushion finished this week. As I explained last week, I haven’t been enjoying doing this one (not the fault of the project itself – the lovely pincushion design is from Carolyn Pearce’s ‘Home Sweet Home Workbox’ book) – but more to do with how I was feeling about it.

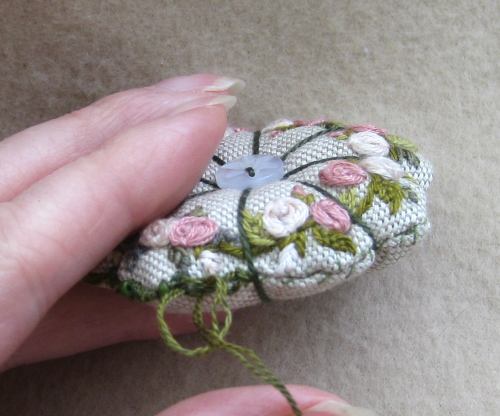
So, this is the back of the pincushion, showing how I tied the strong green thread around the pincushion, pulling it tight and fastening a tiny button in the centre. I wasn’t quite happy with the squiffy shape of the pincushion at this stage – a bit lop-sided, and not very round.

Home sweet home pincushion 6

At the point when this photo was taken, I had just started to work the beaded hedebo edging around the pincushion.

Home sweet home pincushion 7

This is a lovely stitch, but takes a bit of planning. You need to make a foundation row of cross stitches – one short, one long, one short, etc – along the length of one section of the pincushion, across the seamline. First, you stitch all the ‘bottom left to top right’ slanting stitches.

Home sweet home pincushion 8

Then you go back along the section, stitching the ‘bottom right to top left’ stitches. It looks very messy at this point, but these stitches will all be covered later.

Home sweet home pincushion 9

Then, with the same length of thread, you attach a green seed bead on top of the first, small, cross stitch, anchoring it in place by going through the bead twice, and making a small stitch neatly in the fabric.

Home sweet home pincushion 10

Over the long cross stitch alongside it, you work a row of buttonhole stitches, without piercing the fabric itself, so that you create a lacy-looking edging. When you have tightly filled the long cross stitch, you attach another bead over the short cross stitch….and so on all around the edge of the pincushion. It’s actually easier to do than it is to describe! Carolyn’s book has very detailed instructions with photos at the back of her book. And her photos aren’t out of focus 🙂

Home sweet home pincushion 11

So, this is the finished pincushion, which I like a lot more, now that it’s finished! Cute, isn’t it?

I think that the next ‘small’ for the workbox that I’ll make will be the spool holder, with the oranges on it and the wildflower border around the sides.

~~~~~~~~~~~~~~~~~~~~~~~~~~~~~~~~~~

Dollhouse Needlepoint newsletter sign-up invitation