Toy chest etui by Betsy Morgan: 3 – button box and ‘magic’ needle case

This little button box (measuring just an inch and a half square ) is part of the Toy chest etui by Betsy Morgan of Willing Hands. I made it in 2012, as part of the etui set – a toy box, filled with sewing accessories shaped like toys. The motifs on each side all begin with the letter B: button, bird, bee, erm…….rabbit (or bunny, I suppose!).

IMG_2636

Each side has a double border of cross stitches in different colours.

IMG_2637

The inside is lined in silk. I filled it with antique Victorian buttons (something else that I collect!).

IMG_2638

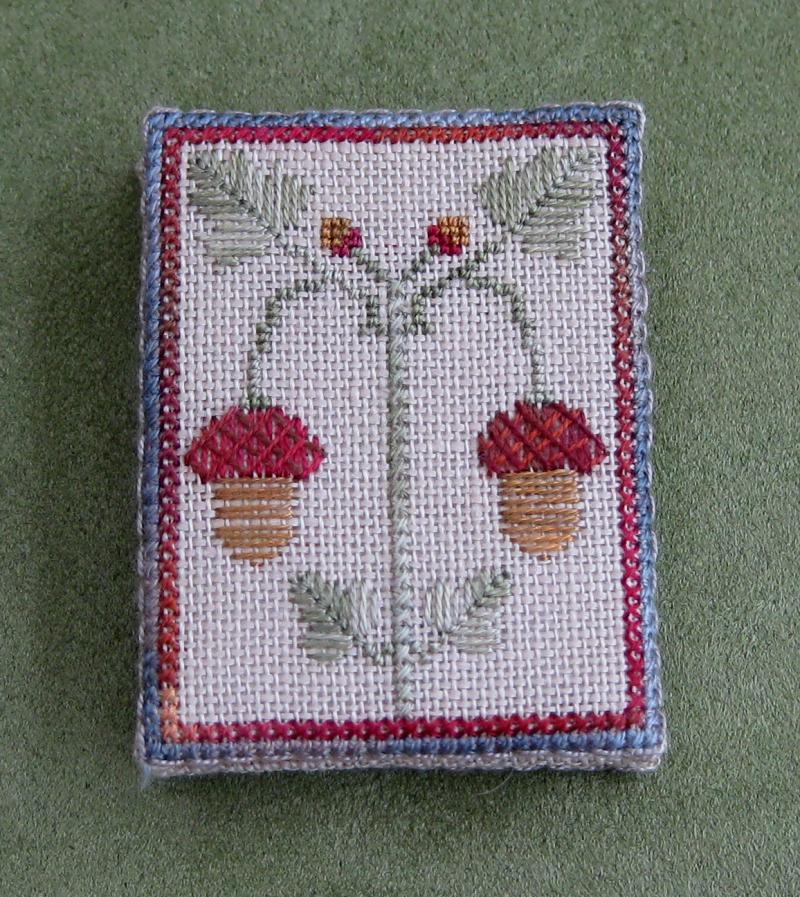
Then there’s THIS. This is a very special needle case. It has a design on the front and back of acorns and cornflowers. This is the front:

IMG_2639

This is the reverse side.

IMG_2640

But the special bit is inside. There is a loose piece of felt, which the needles are attached to. In the picture below, they are on the left side, with the holding ribbons straight across the felt. If you close it, and then open it from the other side…..

IMG_2641

….the needles have magically moved to the right hand side, and the ribbons are now crossed over them! This fascinates me. I know there’s a simple explanation as to why this works. But I assembled the thing, and I’m still not sure how it does it!!!

IMG_2642

These designs are by Betsy Morgan of Willing Hands, and form part of the Toy chest etui set.  She doesn’t sell these items as kits, but you buy the whole project pack as part of the workshops which she offers, which last from a couple of days to a week, depending on the item being made (of course, you don’t *finish* the item in a few days, but Betsy shows you all the steps you’ll need to do, and you get the chance to practice, and ask questions, and get started at least!). Betsy is from the USA, but has been over to England a couple of times. If you get the chance, go and have a look at her other items, and list of course dates on her blog. In October 2016 she will be offering classes as part of the Beating Around the Bush stitching event in Adelaide, Australia, organised by Inspirations magazine.

~~~~~~~~~~~~~~~~~~~~~~~~~~~~~~~~~~

Dollhouse Needlepoint newsletter sign-up invitation


Toy chest etui by Betsy Morgan: 2 – scissor case and fob, thimble rattle and hobby horse

Here are some of the sewing accessories from the Toy chest etui set by Betsy Morgan of Willing Hands that fit inside the toy box (see my previous post). I really enjoyed making these.

This is a scissor case made with pictures of an Amish woman on the front, and an Amish man on the back, in the style of Amish dolls. The Amish don’t make images of people, so these faces are left blank intentionally, as those on their dolls are.

IMG_2627

The scissor fob is like a pencil case. The ‘box’ part of the case is a basketweave pattern in counted thread stitches. The reverse of the pencil case has a space to put the stitcher’s initials and the date.

IMG_2628

This is a baby’s rattle. It has a wooden handle, which is cleverly  fixed into the drum through circular layers of cardboard that have been covered with silk.

IMG_2629

The handle is held in place inside the rattle by a kind of tiny cotton reel. A thimble goes inside the rattle, and if you shake it gently, it does actually rattle!

toychestthimblekeep03

It was really fiddly to get this assembled, but it’s come out really neatly, in the end. Betsy’s instructions are very good!

IMG_2631

This is a hobby horse, and the stick is a laying tool. The head shape is double-sided, with a space in between for the laying tool to go. The mane is made from loops of soft silk ribbon.

IMG_2632

The whole thing is only four inches long.

IMG_2633

The designs are by Betsy Morgan of Willing Hands, and form part of the Toy chest etui set.  She doesn’t sell these items as kits, but you buy the whole project pack as part of the workshops which she offers, which last from a couple of days to a week, depending on the item being made (of course, you don’t *finish* the item in a few days, but Betsy shows you all the steps you’ll need to do, and you get the chance to practice, and ask questions, and get started at least!). Betsy is from the USA, but has been over to England a couple of times. If you get the chance, go and have a look at her other items, and list of course dates on her blog. In October 2016 she will be offering classes as part of the Beating Around the Bush stitching event in Adelaide, Australia, organised by Inspirations magazine.

~~~~~~~~~~~~~~~~~~~~~~~~~~~~~~~~~~

Dollhouse Needlepoint newsletter sign-up invitation


Toy chest etui by Betsy Morgan: 1 – the toy box

This is a project I finished a few years ago, but I thought I’d show you it, as I just love it! It’s a Pennsylvania toy chest etui, with the ‘toys’ being sewing accessories. The design is by Betsy Morgan of Willing Hands. She doesn’t sell these as kits, but you buy the project pack as part of the workshops which she offers, which last from a couple of days to a week, depending on the item being made (of course, you don’t *finish* the item in a few days, but Betsy shows you all the steps you’ll need to do, and you get the chance to practice, and ask questions, and get started at least!). Betsy is from the USA, but has been over to England a couple of times. If you get the chance, go and have a look at her other items, and list of course dates on her blog. In October 2016 she will be offering classes as part of the Beating Around the Bush stitching event in Adelaide, Australia, organised by Inspirations magazine.

The toy chest is about six inches long by four inches high. It’s stitched on 32 count evenweave fabric – mainly over two, but sometimes over one thread, depending on the part of the design. Most of it is stitched in cross stitch, but there are some counted stitches too. Often, the threads are variegated, and always very good quality. All the components that you need come in the project pack (such as the crystal beads for the closures, and the stiff lining fabrics).

IMG_2621

To join the panels together, the edges of each piece have backstitch worked around them, so you mount each piece onto stiffener and then join the backstitching together with a ladder stitch. It’s a very neat way to finish off the edges.

IMG_2622

This is the back of the toy chest, with the date I finished it embroidered on it – 2012.

IMG_2623

Each end of the toy chest has a horse motif stitched on it.

IMG_2624

The box is lined with fine silk, in a check pattern. I didn’t have to make it match, but being picky like that, I decided that I wanted to – not the easiest of things to do, but it came out OK in the end!

IMG_2660

The toy chest is filled with all kinds of ‘toys’ – the sewing accessories. This is a hint of what I’ll show you next time….they only just fit!!

IMG_2625

Isn’t it a lovely thing?!

~~~~~~~~~~~~~~~~~~~~~~~~~~~~~~~~~~

Dollhouse Needlepoint newsletter sign-up invitation


The lull after a big project is finished…..

If you’ve been following my journey through embroidering the ‘Home Sweet Home’ workbox, you’ll be very aware that it has taken me well over a year to make it! Now that that project is finished, I am in that strange phase of ‘not having anything to stitch’.

Well, that’s not exactly true, as any stitcher will tell you  🙂   I always have more than one project on the go – either one of my own doll’s house needlepoint designs that is being stitched up prior to being launched as a kit on my website, or something smallish that I may be making as a gift for someone else. But more likely, it’s one (or more) of the many items from my stash that I am gradually working through. Although it’s not actually ‘work’!

As soon as I finish one project, though (and I mean literally minutes after finishing) I have an urge to start something else, even if I have several other projects on the go already. This means that I am never completely ‘projectless’. I liken it to people who smoke – they just have to have something to hold, to ‘prop them up’ in some way. I do it with stitching. I hate the thought of not having something that I can just pick up and immediately stitch. And I love starting new things.

At this ‘in between’ time, though, when I’ve just finished a large project and not yet started another large one, I often wind down by doing simple cross stitch projects for a while, to get back to a place where I can really decide on something I can get my teeth into. I’ve got shelves of embroidery magazines and books, as well as vintage kits (I’m a sucker for those!), plus lots of bits of fabric that I could design something unique for…

So, here’s a quick run through of what’s in progress at the moment and what I’ve got in mind to stitch next:

I’m gradually working my way though the Lavender and Lace Celtic Ladies designs. I’ve done the Celtic Autumn one so far, and was really pleased with how that turned out (with the adaptation of the leaves falling from her hands):

LL - 26 Celtic Autumn framed

This is the one I’m now doing – this actual one was stitched by someone else (found on Pinterest):

I'd rather be stitchin blog1

This is how far I have got with mine. The fabric is actually a lot more green than in the photo:

Spring 2

I’m also working through this lovely Autumn Quakers sampler, from Rosewood Manor. It’s a good project to work on in short bursts, and still feel as if you’re getting somewhere, as each motif only takes a short amount of time:

Autumn1

I bought this next chart pack when I must have been completely off my head! It’s a ‘Heaven and Earth Designs‘ chart pack, called ‘A Stitch in Time’. It’s absolutely beautiful. It’s huge – about two feet by three feet when finished, on 25 count evenweave, stitched over one. I reckon it will take me seven years to stitch, if I did a hundred stitches a day. And I often don’t stitch a hundred stitches a day, so…….maybe in my next lifetime it’ll be finished? I’ve managed most of the first page from the chart pack so far. Out of 84 pages.

Screendump

I’ve kitted up for this next one, but not yet started it. It’s the Tudor Rose etui set from a recent Inspirations magazine. I’d seen the pale pink version online a few years ago, but now there’s a bright red version, and I just have to make this. It’s an etui set. And it’s red. Can’t get better than that!

Tudor 2

And then there’s this (the image is from the Victoria Sampler website). I’m slowly adding to my Victoria Sampler Gingerbread Village. I love doing these, as they are more than just cross stitch – there’s beading, hardanger, and  other counted thread stitches in the designs as well. I try to make one building each autumn, finishing them in time to display the buildings under my tree at Christmas. I’m aiming to make the Gingerbread Church this time, then maybe the tree next year. Or perhaps the other way around. Haven’t quite decided yet. I love all of them.

GingerbreadVillage2012 on Strawberry Sampler site

And finally, on my wishlist of likely projects, there’s the four seasons bellpulls by Mary Hickmott, of New Stitches magazine fame. I made the ‘Height of Summer’ bellpull years ago:

Summer 500jpg

…..but never got around to making the other three for a complete set. Then a friend of mine, who is also an embroidery designer, gave me three heavy brass bellpull end sets as a gift, so that I can complete my set of four. So, I’ve got no excuse now, have I? I’m planning to start on this one first – it’s called ‘Height of Winter’, and I think I’ll stitch it on 28 count Cashel linen, so it will end up being about 36 inches long.

Height of Autumn

That little lot should stop me being bored for a while!

~~~~~~~~~~~~~~~~~~~~~~~~~~~~~~~~~~

Dollhouse Needlepoint newsletter sign-up invitation