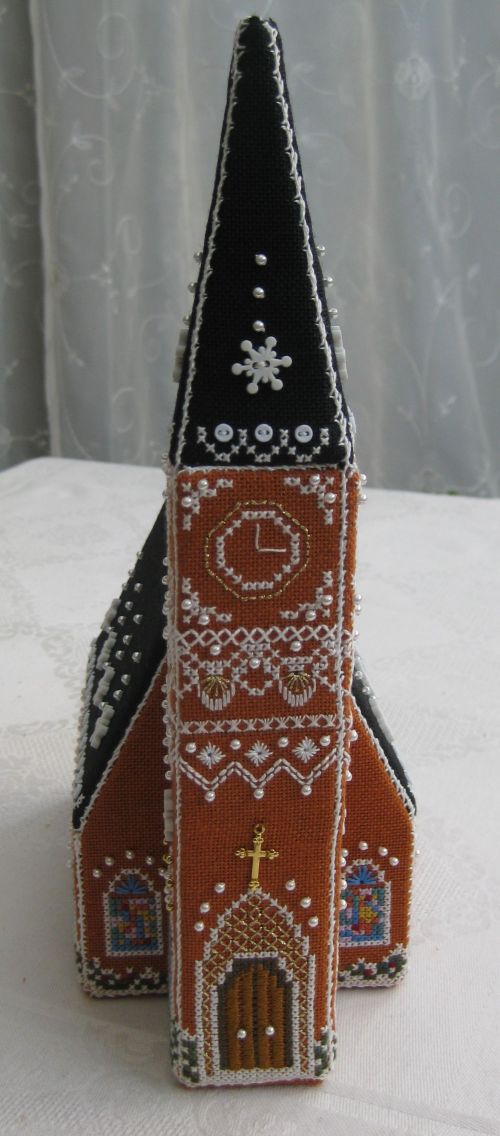
Gingerbread Church by Victoria Sampler 7: ….. and it’s finished!

The final part of the Gingerbread Church assembly that I need to do is to fit together the main body of the church. The instructions in the chart booklet by Thea Dueck of Victoria Sampler are very detailed, so it’s easy to do, but quite time consuming if you want it to come out well.

I first laced up the main roof sections. I held the two pieces at the sort of angle that they would be in when the roof was completed, so that I didn’t lace them up too tightly or too loosely.

Church 34

Then I joined the side walls in the correct order, in the same way that I did with the steeple. Before I laced up the final side to make it into a rectangle, I added the base section (but I forgot to photograph that bit….).

Church 35

So this is the main part of church completed. I attached the roof next, by lacing from the top point of the joined roof sections down to the lower edge, four times, to make sure that the roof was sitting correctly in place, and not twisted.

Church 36

With a curved needle, I attached the steeple. This was FIDDLY!!!  It’s important to make sure that the bases of the main body and the steeple are level with each other first, or the finished building will not sit flat. I laced into every second or third back stitch as I went up the steeple sides, joining the steeple to the main building. I left the stitches very loose until I had done all of one side, then I pulled the stitches taut, and fastened off by hiding the thread in the join between the two pieces of the building.

Church 37

This shows the completed church, seen from underneath. You can see that the base seams are not laced together – I didn’t feel that this was necessary.

Church 38

The chart booklet’s instructions don’t give any guidance about how to join the steeple to the main building. When I first bought the booklet, I emailed Victoria Sampler to ask how I should join them, and someone from their Customer Services section said that the steeple was meant to just be placed alongside the main part, but I didn’t think that that would work, as the steeple is so tall and thin, that it would probably fall over. Hence my ‘solution’. It’s definitely fiddly to do, but it came out very well. I needed to buy the curved needles specially (from Ebay), but they weren’t expensive. I used small ones – about one and a half inches long from end to end, with a large eye.

So, as a final review of this chart booklet, I’d say that this project is just wonderful to do! I love this addition to my Gingerbread Village. I chose to use Zweigart ‘Cognac’ coloured 28 count evenweave fabric, as the suggested Antique Almond is impossible for me to get hold of, but I’m using this shade for all the buildings, and I’m very pleased with it. I used one and a half skeins of Anchor number 2 off white to do all the cross stitching in total, instead of the Kreinik Mori white suggested in the booklet. I also used most of one ball of DMC Perle 8 (as it’s used for joining the panels together, as well as the embroidery).

I bought the main coloured thread and bead/button pack from Sew and So in the UK (but not the white thread pack, which is available separately if you choose to buy that too). The accessory packs are quite expensive, but very high quality. For some reason, the thread pack I bought had far too much Mauve (about three yards of 12 strands), but I almost ran out of one of the greens, despite stitching very carefully so that I didn’t run out. And with the pearl beads, I ended up with only four pearl beads at the end, as I’d had to throw a few away, as the holes were badly drilled and couldn’t be threaded. I think that’s a bit mean, considering the cost of the accessory packs!!

The instructions in the booklet are very detailed, and the stitch diagrams are very clear. Some sloppy editing (I’m a stickler for proper spelling!) lets it down somewhat, but that’s just me being picky. The paper is good quality, and the charts are printed at a good size so that you can work directly from them.

Overall, I’m so pleased with this project, I am tempted to start the next one in the series (the Christmas Tree) now!

Here are some views of the finished Gingerbread Church:

Church 39


Church 40


Church 41


Church 42

And just in time for Christmas, I can put the Gingerbread Church under my tree alongside the Stitching House and Candy Cane Cottage. What do you think of it?


~~~~~~~~~~~~~~~~~~~~~~~~~~~~~~~~~~

Dollhouse Needlepoint newsletter sign-up invitation


Gingerbread Church by Victoria Sampler 6: assembling the steeple

I’ve been assembling the steeple for the Gingerbread Church this week. It’s quite fiddly, but worth it. These are the steeple roof pieces, having each been laced onto the relevant wall pieces with Perle 8 thread.

Church 30

Then these joined sections are laced together, from bottom to top. It’s important to make sure that the bases are exactly level. Here’s the first two pieces joined.

Church 31

I attached the small square base, then finished the last vertical seam.

Church 32

Here’s the completed steeple. Isn’t it lovely?!

Church 33

Now I’ve just got to assemble the main body of the church in the same way, join the two sections together, and it will be finished in time for Christmas!


~~~~~~~~~~~~~~~~~~~~~~~~~~~~~~~~~~

Dollhouse Needlepoint newsletter sign-up invitation


Gingerbread Church by Victoria Sampler 5: mounting the stitching on card

I’ve finished all the embroidery on the Gingerbread Church by Thea Dueck of Victoria Sampler. Now I’m at the point where I need to mount each piece onto thick mount board ready for assembly – it’s a time-consuming part, but necessary.

Church 25

When I decided to make this building, I thought that there wasn’t much stitching to do on it (compared to the Gingerbread Stitching House, for instance). But looking at all these pieces spread out, I can see now that there’s actually quite a lot of stitching on it!

Church 22

To make sure that the pieces of mount board are exactly the right size for each piece of fabric, I scanned in the stitched pieces, then printed them out at 100%, and cut out a template, just inside the back-stitched outlines. I then cut the mount board from these. For the triangular roof pieces, and the pointed wall pieces, I folded the paper in half and cut the paper doubled over to get exactly even shapes. The back-stitching has to sit right on the edge of each piece of card, or the pieces won’t fit together properly.

Church 26

For the long sides, I laced the fabric to the mount board from top to bottom only, then mitred the corners (not as per the instructions, though – they say to use glue, but that’s a bit scary!).

Church 27

For the large pieces, such as the base piece shown here, I laced in both directions.

Church 28

For the pointed pieces, I laced as far as possible up the straight sides, then kind of made it up as I went along! You need to be careful that you don’t push the stitching down to the wide end as you lace the pointed part, as it tends to ‘squeeze’ the fabric off the mount board as you tighten the lacing.

Church 29

Here are all the pieces mounted and ready to lace together. They’re looking good, aren’t they?


~~~~~~~~~~~~~~~~~~~~~~~~~~~~~~~~~~

Dollhouse Needlepoint newsletter sign-up invitation


Gingerbread Church by Victoria Sampler 4: the steeple

I’m back on to working on the steeple of the Gingerbread Church now. I’ve been looking forward to this bit, as it’s so pretty!

This is the door side, showing the door worked in bars of satin stitch over four threads. Around the doorway are large crosses, worked in Kreinik fine gold braid over four threads. Above the door is a cross shaped charm.

Church 18

The doorway is finished off with the tiny pearl beads, as the sides of the main part of the church were.

Church 19

When I made the Gingerbread Stitching House (the first building in this series), I made the mistake of using Anchor shade number 1 for the main white cross stitching, as I didn’t buy the thread pack for that one. When I’d finished all the stitching, I realised that the colour of that thread was slightly different from the DMC Perle 8 and 12 used for the rest of the white stitching. It’s always annoyed me whenever I look at it! With this church, I checked first, and bought some Anchor stranded cotton shade number 2, which is a kind of soft white, and a much better match for the DMC Perle threads, so I’m much happier with this building than the Stitching House!

This is one of the steeple sides, showing the counted thread stitches on the top half – these were great fun to do, and made a change from all the cross stitching.

Church 20

Here’s a close-up of the window, with the beads and snowflake button added.

Church 21

When I’d stitched all four sides, I trimmed the fabric ready for when I mount them on the card. The third piece shown below will fit up against the main body of the building, so that’s why it has the blank part in the centre.

Church 24

If you’d like to get this design to stitch for yourself, it’s available as a chart booklet from Thea Dueck of Victoria Sampler in Canada. I’m really enjoying making this  🙂


~~~~~~~~~~~~~~~~~~~~~~~~~~~~~~~~~~

Dollhouse Needlepoint newsletter sign-up invitation