
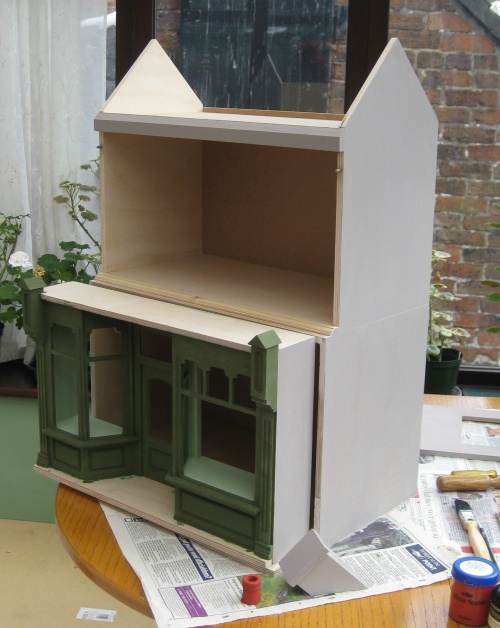
Having done a dry run of my Sid Cooke shop kit, I then pinned and glued it together. This is how it looked when I assembled it roughly, holding it together with masking tape:

The instructions said to glue and pin each panel of the main house in place – the kit even includes plenty of panel pins, and some wood glue – so I had no excuse not to do it properly. It went together very well (but I didn’t take any process photos – sorry!). I had bought this shop kit as two separate pieces, as it’s available like that to give people choice – you can buy just the base shop part, or add on the top half to make it look more like real building. If you buy both, you just glue the middles together to make one structure.
The front lower panel will eventually just lift off from the main shop part itself. It consists of quite a few pieces, but they are all cut accurately, and just needed gluing together with the wood glue. Fine bead trims are provided, cut to length, to cover over the joins of the main pieces, so it ends up looking more complicated than it actually was to assemble. I’m very pleased with how it came out!
The only piece that needed to be put aside for now is the signboard, which is fitted in place last, once the lettering has been added. Not sure yet how I’ll do that.
I then painted all the surfaces with white emulsion paint, partly to stabilise the surfaces ready for finishing with the final colour, and partly to stop the wood from warping if I’d only painted one side of the wood. I even painted the base.
For the top coats, I used various shades of emulsion that I bought as match pots. One match pot in any colour is plenty for painting a doll’s house, and sometimes I bought several close shades at once, and then tried them out at home, to make sure I had exactly the right colour (just what match pots are for, really, but used on a mini house, not a full-sized one!).
Most of the time, I found that Dulux emulsion gave the best coverage, and had a large range of colours to choose from. Wilkinsons paint was too thick, and the colours didn’t match the labels on the outsides of the pots, which was very annoying, and Crown seemed to have far too many beiges, and not much else.
The chimney for this kit is to be painted and attached last, after the roof is on, so I painted the chimney pot at this stage, then put it aside to be ‘bricked’ later.
I also cut the covings and skirtings for the two rooms at this stage, as the covings needed painting (the skirtings needed varnishing – different job!), so while I had the emulsion out, it made sense to paint everything at once.

When the lower shop frontage was completely dry, I undercoated the whole of it with a pale green emulsion, and was planning to do the top coat a dark olive green. This was far harder to find in the correct shade than I’d expected. I looked online for hours, then had a fruitless trip round all the local shops….it’s just that a dingy olive green isn’t fashionable at the moment for real houses, so hardly anyone is making that shade of paint. Eventually, I found the range made by Little Greene. I don’t think they realise how hard they are to find online, when you key in ‘little green pot of paint’ into Google! You’d expect them to come up first, wouldn’t you? It took me days to find them, as Google doesn’t work like that 🙂 Anyway, the olive green paint I used (undercoated with a pale green emulsion) was this Little Greene match pot which I sent off for, and was a beautiful Edwardian-looking shade. Eventually.

The inside of the shop window area I painted with Dulux emulsion in ‘Putting green’ shade – a soft pale green. I’ll need to make some kind of shelving for the inside of the bay windows at some point to display the toys on, probably painted in the same colour.

This shows you how it will fit together:
Next up, painting and wallpapering the interior.
~~~~~~~~~~~~~~~~~~~~~~~~~~~~~~~~~~