Making a mini quilt 2: ‘Foursquare’ by Jo Morton – completing the quilting, and comparing quilting styles

I’m making the ‘Foursquare’ mini quilt from Jo Morton’s book Jo’s Little Favorites 2  (the middle one on the cover of her book).

Foursquare mini quilt patchwork Jo Morton book

I got a bit carried away with my quilting after my last blog post, and didn’t take pictures till the end – sorry!

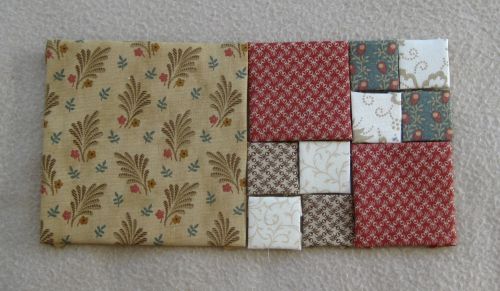
I added wide dark brown fabric borders to the central panel of blocks, then removed all the papers from the little squares (I didn’t make a paper pattern for the wide borders). Then I ironed the quilt top, trimmed the edges completely square, then cut one piece of toning fabric for the back, using the top as a pattern. Using the top again as a guide, I cut a piece of thin wadding (a mini quilt only ever needs very thin wadding, or it would be out of scale). I cut it oversized at first, then trimmed it back as necessary, as wadding tends to ‘shift’ a bit as you pin it into position.

I cut two inch wide strips of the mustard colour print fabric, and made binding for the edges, which I hand stitched in place.

Foursquare mini quilt Jo's little Favorites 2 Jo Morton patchwork

For this quilt, I decided to give it a go and do the actual quilting by machine, which I now think was a mistake. It has come out very neatly, but a bit TOO neatly for me! It doesn’t seem to have much character to it now.

Foursquare mini quilt Jo's little Favorites 2 Jo Morton patchwork

I drew two lines in each direction with a water soluble pen on the fabric top, in each direction, to start me off, then the rest of the quilting lines I stitched by eye, once I’d got used to the amount of spacing to leave each time. I’d thought that would give it less of a ‘manufactured look’.

Foursquare mini quilt Jo's little Favorites 2 Jo Morton patchwork

It’s come out nice, but a bit bland, I think! The quilting is well-defined, but too regular for me.

Machine quilting example

In comparison, here are some other mini quilts that I’ve made previously. This one was a print of quilting squares that I made into a ‘cheater quilt’, as it’s not real patchwork – it’s just printed on! But I did hand quilt it, and it’s come up nice and ‘puffy’ now that it’s been washed.

Cheater quilt fabric

This design is called Lincoln’s Logs, and it’s the second quilt I ever made. My stitching is quite large on this one, but again it’s got a lot of character, so I like this one:

Hand quilting example

This one below is my favourite – the first one I ever made. The actual patchwork is pretty awful – you can see the tips of my triangles are cut off by the seamlines, as I stitched this one the ‘proper way’ by machine, and I kept getting my seam allowances wrong! But as far as the quilting goes, this one came out well – the stitches are small, the thread weight works, and the wadding was very thin, so it’s a flexible little quilt.

Four Fat Quarters hand quilting example

But machine quilting my mini quilts? Don’t think I’ll be trying that again.

~~~~~~~~~~~~~~~~~~~~~~~~~~~~~~~~~~

Dollhouse Needlepoint newsletter sign-up invitation


Making a mini quilt 1: ‘Foursquare’ by Jo Morton

Every now and then I take a break from embroidery, and doll’s houses, and make a mini quilt. They make a nice pause, in a way – quite quick to do, and portable, which I often need, as I travel quite a lot.

This quilt is one from a book that I recently bought on Amazon called  Jo’s Little Favorites 2 . Jo Morton has published several mini quilt books, and I love all of them! The quilt I’m going to make is the one in the middle on the front cover. It’s about 20 by 26 inches, when finished.

Foursquare mini quilt patchwork Jo Morton book

I decided to make a few changes to the design shown in the book – I’m going to make it a little bit smaller, with not as many blocks to it, and I’m going to change the colourway so that mine has more red in it, and no blue. This is my planning stage:

Foursquare mini quilt patchwork Jo Morton book

I don’t stitch my quilts together on a machine – I hand piece them, as I love hand sewing. So, I work out the sizes of each block from the instructions in the book, then draw a full size paper pattern (photocopying multiples, if necessary, as that’s quicker), then cut out each block pattern from medium weight paper. Then I cut the fabric pieces – usually by hand, rather than using a quilt fabric roller cutter, as these are small quilts, and it doesn’t take long to cut each piece with scissors.

I use quilting glue (like Pritt Stick, but pink – and it dries clear) rather than tacking the fabric onto each piece, as it’s really quick and precise.

Foursquare mini quilt patchwork Jo Morton book

This means that each block piece is accurately sized, and I can then decide how I want to piece them together.

Foursquare mini quilt patchwork Jo Morton book

I use these nifty little clips when I’m oversewing two pieces together, to hold the edges in place strongly while I stitch.

Foursquare mini quilt patchwork Jo Morton book

If you get ‘proper’ branded ones, they are really expensive, but cheap versions are available on Ebay, and to me they look the same, and are about a quarter of the cost.

Foursquare mini quilt patchwork Jo Morton book

When each little block is stitched together, I can then assemble them into larger blocks, making sure that the pattern works.

Foursquare mini quilt patchwork Jo Morton book

This is what the back looks like – you can just about see that on some of the pattern pieces I wrote ‘light’ or ‘dark print’ for example, so that I’d know how many of each type to cut from the fabrics. I leave the papers in until right at the end.

Foursquare mini quilt patchwork Jo Morton book

Small blocks are sewn together into strips:

Foursquare mini quilt patchwork Jo Morton book

…and then the strips are sewn together to make the whole central panel of the quilt.

Foursquare mini quilt patchwork Jo Morton book

This shows the back, at this point:

Foursquare mini quilt patchwork Jo Morton book

So, now I’ve just got to make the wide border, then bind it, before doing the quilting.

~~~~~~~~~~~~~~~~~~~~~~~~~~~~~~~~~~

Dollhouse Needlepoint newsletter sign-up invitation


How to make an American Civil War mini quilt using English Paper Piecing: 3: ‘Lincoln’s Logs’

Now that I’ve finished the patchwork top of my American Civil war quilt, I can put together the layers, and do the quilting.

With big quilts, this stage can be difficult, as you need a lot of space to spread out the fabrics. My quilt is only 22 by 27 inches, so it’s not a problem! I did mine on the floor in my conservatory!

I put the backing fabric down first, wrong side up, then spread out the wadding (100% cotton heirloom wadding), then the ironed quilt top. Making sure there were no creases in the three layers, I put pins in every four inches or so over the top of the quilt to hold it all together. Then, with sewing cotton I made a grid of long tacking stitches over the whole of the quilt, with about three inches between rows, starting in the centre and working out to the edges.

Civil War reproduction quilt Lincoln's Logs

As my quilt is small, I put the binding on at this point. If you make big quilts, you’d probably think I’m daft to do this, but I find that it works! The layers don’t shift much with a small quilt, so I can get away with it.

This is the back of the quilt – gorgeous fabric, isn’t it?

Civil War reproduction quilt Lincoln's Logs

I put a few extra pins in to keep the layers together, and started quilting  – by hand, with polyester thread. I didn’t use a pattern for this one – I just echoed the edges of the pattern pieces.

Civil War reproduction quilt Lincoln's Logs

When all the quilting was done, I washed the quilt, and hung it up to dry in the conservatory, so that it started to have that old-fashioned crinkly look.

Civil War reproduction quilt Lincoln's Logs

This is the finished quilt – it measures 21 by 25 inches. It has ended up looking quite different from the way I thought it would. And very different from the example in Carol Hopkins’ book. But I like mine, with more red in it than the example that I started out wanting to copy.

Civil War reproduction quilt Lincoln's Logs

This is the one in Carol Hopkins’ book:

Lincoln's Logs patchwork quilt

As usual, I’m not totally happy with my stitching – I wish I could get my stitches smaller and more even, but it’s quite a bit better than my previous quilt, so I’m getting there slowly!

Civil War reproduction quilt Lincoln's Logs

This shows the back and front of the quilt:

Civil War reproduction quilt Lincoln's Logs

I use my little quilts as mats around the house, and as covers for side tables – anything that looks a bit bare, really! And as soon as I’ve finished one, I want to start another one….!

~~~~~~~~~~~~~~~~~~~~~~~~~~~~~~~~~~

Dollhouse Needlepoint newsletter sign-up invitation


How to make an American Civil War mini quilt using English Paper Piecing: 2: ‘Lincoln’s Logs’

This is how far I’ve got with the American Civil war mini quilt that I’m making using the English paper piecing method. I’ve sorted out the fabrics for each block now:

Civil War reproduction quilt Lincoln's Logs

Once I’ve cut out the pattern pieces, based on the measured papers that I made before, I can arrange them on the reverse of the fabric from the charm pack pieces.

Civil War reproduction quilt Lincoln's Logs

I use a tiny bit of glue from a special glue pen to hold the paper in place on the fabric while I cut it out. These glue pens are wonderful – they are from the Sue Daley range, made specially for patchwork. The glue is pink in the stick, but when it dries, it dries clear. So you can see where you’re putting it, but it doesn’t mark the fabric permanently pink. You can get refills easily, too. It helps to keep it in the fridge till you’re ready to use it, as if it is at room temperature, it’s a bit soft, and you end up using more than you need to.

Civil War reproduction quilt Lincoln's Logs

As my quilt is only little, I cut all my pieces out with scissors. If I had hundreds to do, I’d use a rotary blade and a cutting mat. I make my seam allowances about a centimetre, rather than the recommended quarter of an inch, as it makes it easier to get accurate folds on the seams, as I’ve got more to get hold of.

Civil War reproduction quilt Lincoln's Logs

I put a line of glue on the paper, then fold the fabric over and press it in place. The glue dries really fast. I just fold each side over (not mitreing corners or anything) going round the shape until all four are done.

Civil War reproduction quilt Lincoln's Logs

This is one block, ready to be stitched together by hand.

Civil War reproduction quilt Lincoln's Logs

Here’s the twelve blocks, once I’d stitched them all together. I use polyester thread, in a neutral tone, and just oversew the pieces together.

Civil War reproduction quilt Lincoln's Logs

The sashing pieces (joining strips) are made in the same way – by glueing the fabric over long strips – except that I made these intentionally longer than they needed to be, to give me ‘wiggle room’ when stitching them to the other blocks.

This is the layout:

Civil War reproduction quilt Lincoln's Logs

Each long strip is pinned in place,  and then oversewn to the main part, right sides together.

Civil War reproduction quilt Lincoln's Logs

It’s tempting at this point to remove all the papers from the back, but it helps to have the main area still quite stiff with the papers in, while I’m adding the wide borders.

Civil War reproduction quilt Lincoln's Logs

The long border pieces are added first, then the short ones. I didn’t mount these wide borders on paper first – I just turned a narrow seam allowance and pressed it in place, then oversewed the edge to the edge of the dark brown strip.

Civil War reproduction quilt Lincoln's Logs

This is the bit I look forward to! Taking out the papers! Suddenly, the quilt goes from being lots of stiff little bits of fabric, to one soft and flexible quilt top, that has become something different in the process.

Unlike a quilt made by machine, the seam allowances aren’t pressed over to one side – they are left open like this. Later, the whole quilt top will be pressed before being layered with the wadding and backing.

Civil War reproduction quilt Lincoln's Logs

~~~~~~~~~~~~~~~~~~~~~~~~~~~~~~~~~~

Dollhouse Needlepoint newsletter sign-up invitation