This is the original design I chose from the ‘World of Ornament’ book to run along the bottom edge of the Aramaic Lord’s Prayer panel. It is Moorish-inspired. I wanted a repeating pattern that wouldn’t be too difficult to render in embroidery, but which would give the look of a wide solid line to the base of the panel when viewed from a distance, to ‘ground’ the whole piece.

I knew I would have to eliminate quite a lot of the detail, in order to stitch the design. Those little white dots would have to go, for a start! I worked out a repeating pattern for the colours I wanted to use, and stitched the basic lotus-shaped areas first. Then I edged the circles with Coats Ophir thread, in one continuous line from left to right going over and under the shapes, then back the other way from right to left, completing them.

The original design had quite a ‘coloured in’ background,and I wanted to give the effect of this without doing some really dense stitching such as long and short stitch, for instance. So, I stitched a line of buttonhole stitches along the top edge in Thread Gatherer Silk ‘n’ Colors 1027 Leprechaun, altering the length of each stitch to fill the gaps between the circles. Along the bottom edge, I attached clusters of three red beads. A size 11 gold sead bead finished off each of the lotus flowers.

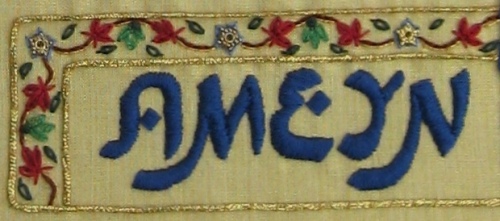
The final word to decorate on the panel was the word ‘Ameyn’ – in English that’s what we know as ‘Amen’. The word ‘Amen’ is often understood as just a kind of ‘the end’ word, when people say prayers in English, but in Aramaic, the word has whole layers of meaning! One of these meanings, which I really like, is, “May this be the ground from which our new growth will spring.” It has a very organic feel to it. I chose this border pattern as my starting point for this part of the panel:

As you can see, it doesn’t have many colours to it, but I wanted the colour selection for the embroidery to blend in with the other borders in the panel – so, it would have red and blue flowers, along with gold highlights, like the other borders.

I found some sweet little spacer beads in my beading stash ( I do beading, too – maybe one day I’ll show you…), and I felt that these would make very nice ‘flower centres’. I attached the spacer beads with Guterman thread, then stitched individual fly stitches around each of the five sides of each bead, with one strand of light blue Anchor thread. The rest of the leaves and flowers were made from lazy daisy stitches and fly stitches. The stem was one strand of 352 Dark brown Anchor stranded thread, highlighted with couched Coats Ophir thread alongside, as in the other borders. Couched Kreinik braid #16 around the edge completed the area.
For the final outline around the whole panel, I had various options. I had considered quite complicated bands of couched gold, red and blue, for example. or heavy stretched pearl purl intertwined with red thread (to echo the band across the centre of the panel). Or even appliqued red kid pieces at the corners, with complicated linking bands of various stitches in between. But when I looked at the almost-finished panel, I felt that it was quite busy enough, and only required a simple finish. Also, the idea of chain stitch appealed to me, as it was a simple ‘link’ around all of the words, expressing the idea that the whole Prayer can provide a link between our everyday lives and the sacred.

So, eventually the outer border was stitched with four strands of Anchor stranded thread 152 Navy, in chain stitch.
Then came the bit I don’t like doing….I had to finish it all off. I usually rush the finishing part of any project, as I don’t have the patience to slow down and do it all properly, but it was important to me to get this right, as it’s a present for my Sufi teacher. I cut the fabric from the frame, and debated with myself whether or not to risk ironing it from the reverse side. I decided against it, as the gold thread and the beads might not have liked that!
I trimmed the muslin backing fabric and the yellow silk down until they were both about three inches wider on each side than the backing board itself. I cut the backing board slightly smaller than it was when I bought it as an insert in a frame, as I wanted the double layer of fabric, once mounted on the board, to not pucker up when I put it into the frame, but to sit quite loosely. I discarded the glass that had come with the frame, as I don’t like embroidery to be squashed behind glass. It makes the embroidery lose its tactile quality.
Before lacing the stitching to the board, I cut a piece of two ounce wadding, half an inch smaller all round than the mount board, and fixed it in place with strips of double-sided tape, so that the finished stitching would be slightly padded in the frame.
To lace the fabric to the board I used Coats perle no 12 thread, as it is very strong. I laced the fabric (both layers at once) top to bottom first, making stitches every half inch or so, and only gently pulling the thread as I went. Then I went back over the lacing, pulling really tight after making all the stitches, and holding the lacing down with my thumb after each tug, to keep the perle thread tight until the very last stitch, when I could fasten off really securely.

Then I repeated the procedure going from side to side across the panel.

Almost done!!
~~~~~~~~~~~~~~~~~~~~~~~~~~~~~~~~~~