How to wallpaper a dollhouse and how to lay self-adhesive dollhouse flooring

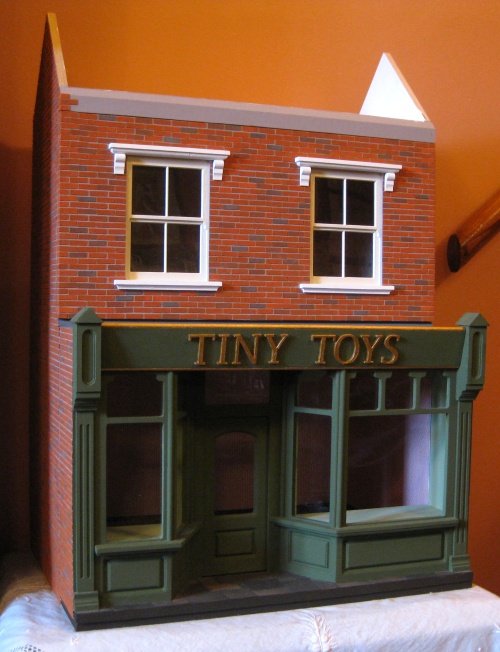
The 1:12 scale Sid Cooke Edwardian shop that I am building is the first dollhouse kit that I have ever put together. So when it got to this part, I Googled ‘How to wallpaper a dollhouse’ for some help, but to be honest, there wasn’t much. ‘How to lay self-adhesive flooring’ turned up even less….. so I worked out my own version!

I did get rather carried away with what I was doing, though, so I don’t have ‘process photos’ for this blog post – but I do have some rather nice ‘finished’ ones  🙂

This is the point where I started – the interior of the doll’s house shop had been painted with white emulsion, to give a better key for the wallpaper paste (otherwise, the paste would just seep into the plywood/MDF walls really fast).

I chose to paint the ceiling with two coats of white emulsion, and cut and fit the coving as well, before wallpapering.

Sid Cooke dollhouse shop interior painted

For the downstairs of my shop, I wanted a pinkish/feminine look, as the shop will feature mainly dolls downstairs. I found a lovely 1:12 scale wallpaper from Les Chinoiseries in Spain with a frieze of Victorian dolls around the top. I bought three sheets, as the lift-off frontage will be painted, not papered, so three is enough. Each sheet is about 18 inches wide, and my miniature shop is 17.5 inches wide on the outside, so that was plenty.

I cut test wallpaper pieces out of plain paper first, to make sure everything fitted, then I measured again and cut the pieces from the real stuff! I cut the side wall pieces with a half inch overlap to wrap around onto the back wall, which I pasted in first, and then the back wall piece I cut exactly to size, and fitted that in last. My pasting technique is to paste the wall lightly, and then paste the paper as well, and then slide the paper about on the wall until it’s in place properly. I used a soft make-up sponge to smooth out the air bubbles in the paper. This brand of paper is quite robust, but sometimes you’d need to be careful at  this point, or the paper can rip while it’s damp. I used ‘normal’ wallpaper paste (for real houses!), diluted a bit more than was recommended on the packet, and applied it using a one inch wide brush.

Then I left everything to dry – testing it occasionally with the sponge to make sure any small bubbles were squished out to the edges.

This is the downstairs of the shop:

How to wallpaper a dollhouse tutorial

For the upstairs of the shop, I haven’t quite decided yet what I will display there, so I wanted to make the wallpaper design sort of ‘flexible’ – it might end up being a second shop room, but it might also be living accommodation – so I chose a beige floral wallpaper for this room. I applied it in the same way as for the downstairs room. It was easier to do, as the wall height is lower in the upstairs room, so the floppy pieces of wet wallpaper were easier to handle!

How to wallpaper a doll's house

So far, I have just painted the reverse of the lower lift-off front a light green emulsion, as it’s such a complicated panel, with all those window cut-outs, that I’m not sure how I will decorate that – but as it’s on the inside of that panel, I don’t think it’ll be seen much, anyway.

I intend to make little removable shelves for the two bay windows later, too, and maybe add some bunting.

Tutorial on how to wallpaper a dollhouse and paint the interior

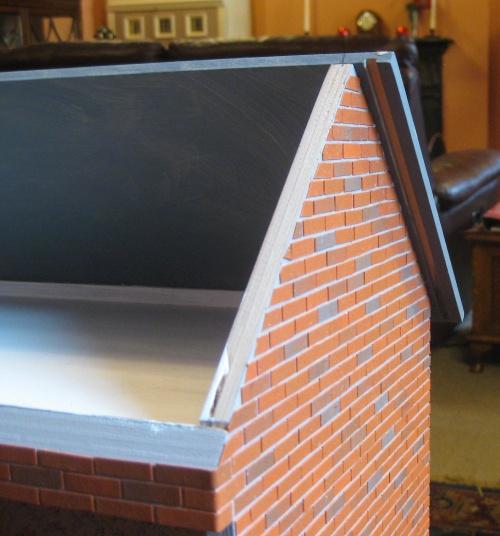
The next little job was to hang the upper wall panel onto the body of the dollhouse. The Sid Cooke kit came with hinges to do this part – but they were enormous, and I don’t like realistic scale models being ruined with chunky hinges. So, my husband designed this snazzy method to hang the panel – he drilled a hole in the side walls near the top, then filed down a nail that would fit tightly in the hole, then added glue to the drilled hole and bashed in the nail. On the front panel itself, he marked where the nails touched, then drilled a hole for the nails to fit into (after I’d wallpapered the panel ). The nails are deliberately at a slight angle, pointing upwards, so that you kind of slide the panel down onto the nails, so that it’s held in place with gravity. The nails stick out about 3/8 of an inch. Neat, eh?

How to attach the removable front on a dollhouse

For the floor in each room, I bought a sheet of real wood flooring from Jaspers Miniatures – this is great stuff to use. It comes as a sheet of strips all glued onto one piece of paper, and you just cut it to size with a craft knife, peel off the backing and lay it in place. Be warned, though, that the glue is really strong, and once it’s touched something, you won’t get it off easily! Once I’d cut the pieces to size and peeled off the backing, I started by lining them up with the front edge of the room, and then kind of rolled them back towards the back wall. Any little gaps around the edges are then covered when you stick the skirting boards in place. I bought walnut coloured floor boards, and then varnished whitewood skirtings with walnut varnish, so the two items matched very well when I’d finished.

How to lay self adhesive wood flooring in a dollhouse

What do you think of it?

~~~~~~~~~~~~~~~~~~~~~~~~~~~~~~~~~~~~~~~~

Are you interested in doll’s houses and stitching? Then why not visit my website, where you can buy doll’s house needlepoint kits to make all kinds of soft furnishings for one-twelfth scale dollhouses. There are over 280 kits to choose from, plus chart packs, fabric project packs, tutorials, and lots of eye candy to inspire you! Kits are available on 18 and 22 count canvas, 28 and 32 count evenweave, and 32 and 40 count silk gauze, so there’s something for everyone – from beginners to experts.

~~~~~~~~~~~~~~~~~~~~~~~~~~~~~~~~~~

Dollhouse Needlepoint newsletter sign-up invitation


Special commission for the No Kid Hungry project in the USA

Recently on Facebook, a woman called Annette posted an appeal for anyone who would be able to design a dollhouse sampler for her, to be used to help spread the word about the No Kid Hungry project. The editor of American Miniaturist magazine saw the post and tagged me into the conversation, and I soon became interested enough to offer to design a 1:12 scale miniature sampler to help out – this special commission for the No Kid Hungry project is rare for me, as I don’t usually take on ‘commissions’ of any kind – I’m simply too busy – but this one appealed to me, as it was for a charity which aims to help children in poverty in America.

Annette told me that she is making and furnishing a doll’s house to be raffled off to raise money, but she wanted a sampler inside the house which would echo the charity’s slogan, so I said that I’d help if I could. This is what I designed for her. The colours echo the logo colours of the campaign:

No Kid Hungry dollhouse sampler

Annette explains all about it:

The house was given to the manager of the Arby’s restaurant in New Berlin, Wisconsin (located at Moorland and Beloit Road) and will be raffled off to raise money for the NO KID HUNGRY campaign.  The manager happens to be a cousin of mine!  

This is a charity run by the Arby’s Foundation.  Their mission statement:

Our vision is to ensure that all children in America have access to wholesome food – every day. We believe a child’s potential for success begins with a meal, and together we can ensure every child has the food they need to succeed.

A bit of history:

The Arby’s Foundation was founded in 1986 as a way for Arby’s to give back to the communities we serve. For 30 years, we’ve donated over $76 million to various charitable causes across the country. Since 2011, the Foundation has focused its mission to ending childhood hunger in America, contributing over $21 million to hunger relief organizations in all 50 states.

NO KID HUNGRY 

Arby’s works hard to make a difference in the communities we serve by impacting the issue of childhood hunger on national, state and local levels.

Nationally, we partner with Share Our Strength’s No Kid Hungry® campaign. As a Core Partner of the No Kid Hungry campaign, the highest delineation for a partner, we work with them on all levels to take a strategic approach to ending childhood hunger by funding long-term innovative programs and sustainable solutions that impact the issue of childhood hunger.

ABOUT THE ARBY’S FOUNDATION, INC.

The Arby’s Foundation, the charitable arm of Arby’s, carries out a mission to end childhood hunger in America. Building on a philanthropic heritage that has contributed over $76 million to child-related causes since its inception in 1986, the Arby’s Foundation is working to ensure every child in America has the meals they need to succeed, especially when school is out. With more than 16 million U.S. children—more than 1 in 5—facing hunger daily, the Arby’s Foundation has devoted its resources to providing education and access to wholesome food choices for children across the country. The Arby’s Foundation is a registered 501 (c) (3) organization headquartered in Atlanta, Georgia.

*****************

I felt that this was a charity worth supporting, so I designed the sampler, and sent the chart and enough materials to stitch it, to Annette’s cousin. She stitched it really well, found a gorgeous frame and mount to put it in which really sets it off, and then it was put in the doll’s house.

No Kid Hungry dollhouse sampler

Doesn’t it look great in the doll’s house? The sampler measures about two inches by three when framed, and is stitched on 32 count evenweave fabric with one strand of Anchor stranded cotton (floss).

I really hope that it helps to raise money for the No Kid Hungry project!

~~~~~~~~~~~~~~~~~~~~~~~~~~~~~~~~~~~~~~~~

Are you interested in doll’s houses and stitching? Then why not visit my website, where you can buy doll’s house needlepoint kits to make all kinds of soft furnishings for one-twelfth scale dollhouses. There are over 280 kits to choose from, plus chart packs, fabric project packs, tutorials, and lots of eye candy to inspire you! Kits are available on 18 and 22 count canvas, 28 and 32 count evenweave, and 32 and 40 count silk gauze, so there’s something for everyone – from beginners to experts.

~~~~~~~~~~~~~~~~~~~~~~~~~~~~~~~~~~

Dollhouse Needlepoint newsletter sign-up invitation


How to tile a dollhouse roof with card tiles

My Sid Cooke dollhouse shop kit was looking good so far – the next stage was that I needed to work out how to tile a dollhouse roof with card tiles! I’d bought the Versi-slate textured card doll’s house roof tiles from Richard Stacey at the same time that I bought the Versi-slips (textured card brick slips) for the body of the doll’s house. The tiles come in smallish packs so you don’t have loads left over, and they are light grey on one side and dark grey on the other, so you can choose to have dark, light, or a mixture of the two – I chose to use all the dark sides. The brickwork had been time-consuming to do, but the finished result was wonderful, so I expected the roof to really look good once it was done.

However….my husband is a perfectionist, so when I said, ‘I’m going to tile my doll’s house roof today!’, he said, ‘What, all of it? In one day? Are you sure?’ Such confidence! I think he thought I’d do it in too much of a rush, or something….Anyway, he decided to help me do it – so we had a great time sticking tiles on all day, and it meant that I could take the photos while he did the fiddly bits!

I had already painted the two sides of the roof with grey undercoat. Chris nailed the roof panels onto the body of the house with panel pins.

I drew guidelines in pencil on the roof before the panels were nailed in place, so that I would then be able to line up all the tiles really straight. The first row up from the bottom is the depth of one whole tile, and the rest are half a tile deep (as the tiles overlap).

How to tile a dollhouse roof

This image shows the overhang of the roof panel when the first one had been attached – you can see the groove that the gable end boards will be pushed into later. All my lovely neat brickwork into the triangle of the roof will be covered up then <sniff>.

How to tile a dollhouse roof

I stuck a thin strip of dark card along the very bottom edge of the roof, so that the tiles would poke out at a bit of an angle, like real ones do. The instructions said to make this about a millimetre deep. Mine was about 5mm deep. Once the strip was stuck on, we realised that you would be able to see the lighter roof colour a bit in between the tiles – it would have been better to make the strip about an inch deep, to cover up the vertical gaps between tiles on the first row.

How to tile a dollhouse roof

So, we ‘coloured in’ the roof with a permanent marker pen for about an inch!

How to tile a dollhouse roof

Using PVA glue, we attached the first row of tiles, starting from the outside edges and working in towards the centre. Working fairly quickly, it allowed enough time to adjust the positioning of the tiles before the glue set.

How to tile a dollhouse roof

After attaching three rows of tiles on the back roof side, we worked out where the chimney stack was to go, and glued that in place.

How to tile a dollhouse roof

This is how we attached each row of tiles – adding a line of PVA, then spreading it out with an old brush (*any* brush is an ‘old brush’ after I’ve been using it, as I never clean them properly!!), putting the glue partly on the previous row of tiles, but being careful not to spread it so low down that it would show when the row of tiles is attached.

How to tile a dollhouse roof

Chris did the fiddly bit of cutting the tiles to fit around the chimney stack. The tiles cut very easily with scissors.

How to tile a dollhouse roof

You can buy packs of ridge tiles, which are made of the same material as the tiles, but to a different shape, and you just fold them in the middle and glue them over the ridgeline of the roof. In this image you can also see the gable ends stuck in place.

How to tile a dollhouse roof

This is the chimney stack, in place on the roof. If I was doing this again, I’d have started bricking the chimney itself from the base up to the top, and not the other way round, as there is a small area that isn’t bricked right at the bottom of the stack, but that’s just me being picky!

How to tile a dollhouse roof

So, this is how my Sid Cooke dollhouse shop looks now. I love the way the roof tiles have worked out. It looks so much more ‘solid’ now, and like a real building!

How to tile a dollhouse roof

To tile this roof, I used 2 packs of the Richard Stacey Versi-slates (each one covers about 185 square inches) @ÂŁ12.95 in 2017 , and one pack of 20 Versi-slate ridge tiles @ ÂŁ2.75, so it was quite a cheap option. The tiles can be bought from the Stacey’s Miniature Masonry website.

And we got it all done in one day!!!  🙂  What do you think of it?

~~~~~~~~~~~~~~~~~~~~~~~~~~~~~~~~~~~~~~~~

Are you interested in doll’s houses and stitching? Then why not visit my website, where you can buy doll’s house needlepoint kits to make all kinds of soft furnishings for one-twelfth scale dollhouses. There are over 280 kits to choose from, plus chart packs, fabric project packs, tutorials, and lots of eye candy to inspire you! Kits are available on 18 and 22 count canvas, 28 and 32 count evenweave, and 32 and 40 count silk gauze, so there’s something for everyone – from beginners to experts.

~~~~~~~~~~~~~~~~~~~~~~~~~~~~~~~~~~

Dollhouse Needlepoint newsletter sign-up invitation


How to add brick slips to a dollhouse shop kit

My Sid Cooke shop kit (‘Number 1, High Street’) was gradually taking shape. The next stage was to find out how to add brick slips to my dollhouse shop kit, to make it look more realistic, and to complete the name board.

I needed to find a name for it first though – some people agonise for ages over the name for their shop. With me, I just thought that it was a dollhouse shop, and it would be selling tiny toys, so I’d call it ‘Tiny Toys’. Simples. Job done  🙂

I bought some MDF letters on Ebay from Dolls House Direct for ÂŁ4.50 for 8 letters, 30mm high, and painted them gold with Humbrol enamel paint. Then I stuck them on the signboard that had already been painted green when I did the rest of the lower front of the shop. The gold trims above and below the lettering were also painted with the Humbrol paint, and then the signboard was fixed in place with wood glue.

Then on to the brickwork….quite a mammoth task, and I was very aware that if I got this wrong, I’d have ruined it (so, no pressure, then!). I had researched online for hours to narrow down what kind of 1:12 bricks I wanted. Brick papers were discounted really early on, as they looked too childish and clunky for me – far too unrealistic. Real brick pieces looked nice, but were very expensive, and I’d worked out that I would need almost 4000 bricks for the front and both sides, so I needed to keep the cost down a bit. Real brick slips would have also made the house very heavy.

I eventually settled on these – brick slips made from card with a textured paint coating. They are called Versi-Slips from Richard Stacey, and are really easy to use. They vary in colour, so when you mix them up they look very realistic. You can get them in a yellow/buff mix, too. I needed four packets, plus a packet of the corner bricks, which are longer, and you fold them around the edges of the house to give a realistic-looking corner. Each packet cost me ÂŁ12.95, so doing the brickwork for the whole of the exterior cost me around ÂŁ55, including the corner brick slips.

I used PVA adhesive to stick the bricks to the plywood/MDF shell of the doll’s house. I used a cocktail stick to put a small amount on each card piece, held it for about ten seconds for the glue to penetrate a bit (or it just ran off), then placed it on the house wall, along a line that I made by sticking a metal ruler in place with masking tape for each course of bricks, moving it down one course at a time. This gave me a solid edge to work to. I found that most of the bricks stuck first time, but a few would curl up and need pressing down until they’d dried out a bit. I pencilled a guideline in centimetres near both wall ends, so that I was sure that I was completing each row perfectly straight. Between each course, I also checked the measurements from each end to the base line, to make doubly sure I was doing it right!

I’d decided before starting the brickwork that although it might be tricky (‘might’?! It was!!!) to apply the bricks around the window woodwork, it would look better later, as the brickwork would look more realistic than if I’d stuck the window trims on afterwards (as then they might look as if they were ‘floating’ on the brickwork). I had painted the window trims first with an undercoat and then two coats of off-white emulsion, then attached them to the house with contact adhesive. This image is upside-down because I found it easier to apply the bricks from this direction, with the house laying on its back  🙂

I found it easier to work from right to left each time. As you can see from this image, the corner bricks were added first, to work out the spacing for a few courses, before adding the bricks for the whole row. I didn’t do the corner bricks up the whole side in one go, though – just a couple of rows at a time was enough.

After sticking on each brick, and before the glue had dried completely, I scraped out any residue with a dental probe (every miniaturist has a dental probe in their toolbox, don’t they?!).

The brick slips were easily cut with scissors to fit around odd shapes, and ends of rows, as you can see here. The narrow strip already bricked that is showing towards the top of this image is the lift-off front for the upper storey, which I bricked first before I stuck the bricks on each side.

As I worked my way down each side, I had to make sure that the courses of bricks ‘flowed’ from the main body of the house on to the front lift-off piece, so I had to use masking tape to hold the two pieces together, and cut bricks in half on alternate rows to keep the pattern going.

After 35 hours in total of sticking on almost 4000 brick slips, it looked like this. I had carefully trimmed a lot of the brick slips up into the ‘triangle’ of the roof area, before realising that all of that would be hidden when I stuck the gable end boards in place, but never mind, *I* know it’ll always be neat under there!

You might also be able to catch a glimpse of the wallpapered interior in this shot – I’ll blog about that another time.

So, this is how it looked after all that brickwork. I’m very pleased with it, but to be honest, I wouldn’t choose to do brickwork like this again. Not sure yet how I’ll tackle the other shop kit that I’m planning – maybe I’ll choose an easier finish, like paint!

The next job is attaching and tiling the roof, which should make it look much more ‘solid’  🙂

~~~~~~~~~~~~~~~~~~~~~~~~~~~~~~~~~~

Dollhouse Needlepoint newsletter sign-up invitation