Carolyn Pearce Strawberry Fayre heart etui 40: attaching the 3 smalls to the etui, and making beaded cords

I am currently stitching the Carolyn Pearce Strawberry Fayre heart etui as a stitchalong project. This week, I have been attaching the 3 smalls to the etui, and making beaded cords for the scissors and ruler. See the end of this post for all the information you’ll need to join in!

~~~~~~~~~~~~~  ***  ~~~~~~~~~~~~~

When I started this project, months ago, I read through all the instructions in the magazine itself, and on the pullout sheet, to get my head around what was needed to make this gorgeous project. But how to attach these three ‘dangleys’ had me stumped for ages, and yet they are crucial to the finished look of it. If I left them off, it would have really detracted from it. But the magazine instructions seemed really unclear to me, so I devised my own way of doing it.

I made a separate cord for each dangley, and now I’m at the part where I could join them all to the bottom tip of the etui.

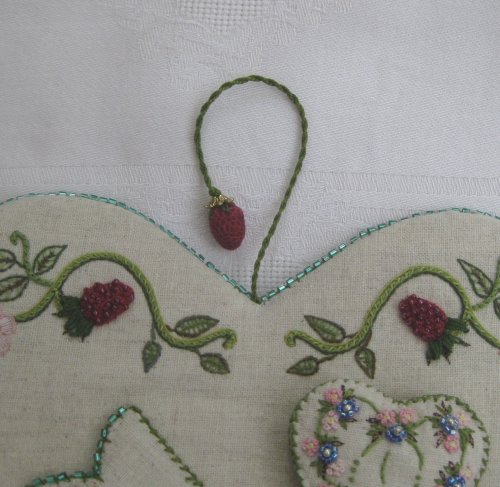
I had bought a large cloisonne bead on Ebay specially, with a diameter of about 12mm, and a large hole of around 3mm, to use as the decorative feature bead at the tip of the heart etui. The large hole is really helpful now! First, thread all three cords through the cloisonne bead. Securely attach a length of green quilting thread to the bottom tip of the back heart panel, then take the needle through the neat ends of all three cords. Then secure the thread to the tip of the front heart panel and pull quite tight. Go back round – back heart, 3 cords, front heart – several times, to make sure the three cords are securely attached.

Carolyn Pearce Strawberry Fayre etui

Lastly, make one knot in all three cords together, under the cloisonne bead, to hold the bead close up to the tip of the heart etui. For added security, I put a drop of Superglue inside the hole of the cloisonne bead and held the cords against it for a couple of minutes to make sure it was all held as one, just before I made the knot.

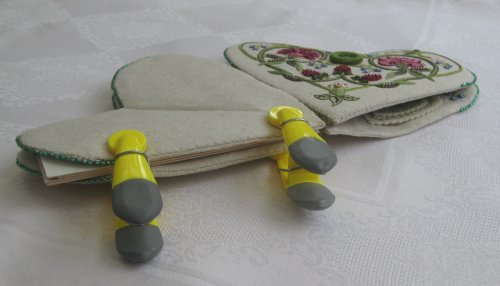
I hadn’t planned to make beaded chains for the scissors and ruler, when I first started to make the etui. I’d planned to just use twisted thread cords. But as I kept looking at the magazine’s pictures, I felt I wanted to do it like the one in the magazine! So, I bought some gold beads from Spellbound Beads, and made my own beaded chains, as per the instructions on page 57 of the magazine (more or less – I couldn’t get exactly the same beads).

I adapted it though (again!) so that I used gold coloured quilting thread instead of tiger tail for the threading, as it’s easier to manipulate, and these beaded chains don’t need to be particularly strong. I started by threading on a bead and tying a knot in the thread, then threading on the calotte crimp. This bead on the end stops the thread from slipping out of the hooked calotte crimp. Then I threaded on gold ball beads, green hex beads, and feature beads, until I’d made  a length about two inches long.

Carolyn Pearce Strawberry Fayre etui

Then I looped the thread through the handle of the scissors, and, leaving a small loop of beads, went back through most of them to the hooked calotte crimp, and knotted the thread to the starting thread. I put a large drop of Superglue on the knot before cutting the thread ends short, then I closed up the calotte crimp with jewellery pliers, slipping a jump ring in the loop with  a lobster claw attached, just before closing it.

Carolyn Pearce Strawberry Fayre etui

I worked out where the chain would come to on the etui once the scissors are in the pocket, and stitched another jump ring to the heart panel fabric alongside the scissor pocket, so that the lobster claw can attach there.

Carolyn Pearce Strawberry Fayre etui

Then I made another beaded chain for the ruler. With this one, I attached it on the right hand side of the pocket as you look at it (rather than on the left, as the instructions suggest), as I had more space there to do it.

Carolyn Pearce Strawberry Fayre etui

So, that’s it! Finished! There’ll be lots of images, and a list of Hints and Tips for doing the whole project, plus a comparison with the ‘Home Sweet Home’ project of Carolyn’s that I previously made, coming up next week…..

~~~~~~~~~~~~~  ***  ~~~~~~~~~~~~~

~~~INFORMATION~~~

The Strawberry Fayre design, plus the complete list of materials, appears in Inspirations magazine number 95The publishers do sell a full materials pack  (not including the mother of pearl ruler though!), but it’s rather expensive, so if you can use your stash, and just fill in with bits and pieces, then so much the better! The magazine is published in Australia – if you live in the UK, as I do, it is cheaper to buy a back copy from Manor House Magazines, and save a lot on the shipping. 

EDIT: The materials pack from Inspirations, and the magazine from Manor House in the UK are not available any more as at March 2018 – I don’t know if any more stocks will be available now, unfortunately. The publishers may bring out a digital pattern pack later, which they sometimes do with popular projects from their magazines, but we’ll have to wait and see…..

To read about this project stitchalong from the beginning, start here. The post about which FABRIC to use is here. The post about the THREAD SUBSTITUTIONS that I made, plus WHERE TO BUY the threads and beads, etc., is here.

To look up all the posts in this series in the sidebar, see under the CATEGORIES list, under: Embroidery / Full size (others’ designs) / Strawberry Fayre heart etui, or use the SEARCH BOX at the top of the blog, and search for ‘Strawberry Fayre’ to get a list of all the posts (but it’s in reverse order, sorry!).

I’d be interested to see images of how your project is progressing – please email large, clear, well-focused images to mail@janetgranger.co.uk  Please bear in mind that any images sent may be used in this blog and/or social media such as Facebook or Pinterest.

~~~~~~~~~~~~~~~~~~~~~~~~~~~~~~~~~~

Dollhouse Needlepoint newsletter sign-up invitation


Carolyn Pearce Strawberry Fayre heart etui 39: how to assemble the pinwheel, and attach the needlelace berry to the etui

I am currently stitching the Carolyn Pearce Strawberry Fayre heart etui as a stitchalong project. This week, I’ll explain how to assemble the pinwheel, and how to attach the needlelace berry to the back heart panel. See the end of this post for all the information you’ll need to join in!

~~~~~~~~~~~~~  ***  ~~~~~~~~~~~~~

This is the third of the ‘dangleys’ that I am constructing, that hang from the bottom tip of the heart etui.

First, cut out the front and back embroidered pieces, place a circle of felt and a circle of acetate on the reverse of each one, run a line of gathering thread round the edge of the fabric, and pull up to draw the fabric over the shapes, lace across the back, then tie off securely.

Carolyn Pearce Strawberry Fayre pinwheel

Take an 8 inch piece of grosgrain ribbon (mine was 3/8 inch wide), and attach it to the back piece using beaded Knotted Pearl Stitch, starting at the centre top, and leaving a 3/8 inch overlap of ribbon that goes beyond the centre point.

Carolyn Pearce Strawberry Fayre pinwheel

As you approach the completion of beading around the circle, trim the ribbon and fold the excess under so that the seam is right at the top. Finish the beading, then slipstitch the join in the ribbon with matching green sewing cotton.

Carolyn Pearce Strawberry Fayre pinwheel

I am not attaching the cord in the way that the instructions in the magazine suggest – which is to attach the thimble holder at one end of the cord, and the pinwheel at the other end, and then attach the cord part way along it to the bottom tip of the heart etui. Instead, I am making a separate cord for each piece, and I will attach each one on its own. For the pinwheel, I used a cord four inches long from the neat end to the knot in the cord that I attached inside the pinwheel itself.

Carolyn Pearce Strawberry Fayre pinwheel

I used a bodkin to poke a large hole through two layers of ribbon at the top of the circle (from the inside to the outside), then I threaded on a daisy spacer, a cloisonne bead, then another daisy spacer, then I knotted the cord to hold the three close to the top of the pinwheel, and trimmed the spare cord inside the pinwheel.

Carolyn Pearce Strawberry Fayre pinwheel

This is all done before attaching the front panel of the pinwheel.

Carolyn Pearce Strawberry Fayre pinwheel

Then the front panel is attached with beaded Knotted Pearl Stitch. Stuff the shape firmly with a small amount of wadding just before completing the circle of stitching.

Carolyn Pearce Strawberry Fayre pinwheel

This is the completed pinwheel. It was at this point (i.e finished!), that I realised I had made it too big. Not sure how that happened, but I must have cut it out following the wrong line of tacking, and it just went downhill from there. It should be much smaller in diameter.

Carolyn Pearce Strawberry Fayre pinwheel

…like this one, from the magazine. Oh well.

The next small job was to attach the needlelace berry to the back panel at the top of the V, with green quilting cotton.

Carolyn Pearce Strawberry Fayre needlelace berry

When the etui is folded closed, this cord is pulled between the heart shapes across the V, and the cord is then wrapped around the Dorset button to hold the etui closed.

Carolyn Pearce Strawberry Fayre needlelace berry


~~~~~~~~~~~~~  ***  ~~~~~~~~~~~~~

~~~INFORMATION~~~

The Strawberry Fayre design, plus the complete list of materials, appears in Inspirations magazine number 95The publishers do sell a full materials pack  (not including the mother of pearl ruler though!), but it’s rather expensive, so if you can use your stash, and just fill in with bits and pieces, then so much the better! The magazine is published in Australia – if you live in the UK, as I do, it is cheaper to buy a back copy from Manor House Magazines, and save a lot on the shipping. 

EDIT: The materials pack from Inspirations, and the magazine from Manor House in the UK are not available any more as at March 2018 – I don’t know if any more stocks will be available now, unfortunately. The publishers may bring out a digital pattern pack later, which they sometimes do with popular projects from their magazines, but we’ll have to wait and see…..

To read about this project stitchalong from the beginning, start here. The post about which FABRIC to use is here. The post about the THREAD SUBSTITUTIONS that I made, plus WHERE TO BUY the threads and beads, etc., is here.

To look up all the posts in this series in the sidebar, see under the CATEGORIES list, under: Embroidery / Full size (others’ designs) / Strawberry Fayre heart etui, or use the SEARCH BOX at the top of the blog, and search for ‘Strawberry Fayre’ to get a list of all the posts (but it’s in reverse order, sorry!).

I’d be interested to see images of how your project is progressing – please email large, clear, well-focused images to mail@janetgranger.co.uk  Please bear in mind that any images sent may be used in this blog and/or social media such as Facebook or Pinterest.

~~~~~~~~~~~~~~~~~~~~~~~~~~~~~~~~~~

Dollhouse Needlepoint newsletter sign-up invitation


Carolyn Pearce Strawberry Fayre heart etui 38: how to assemble the thimble holder

I am currently stitching the Carolyn Pearce Strawberry Fayre heart etui as a stitchalong project. This week, I’ll explain how to assemble the thimble holder that hangs from the bottom point of the heart etui. See the end of this post for all the information you’ll need to join in!

~~~~~~~~~~~~~  ***  ~~~~~~~~~~~~~

This is the main part of the thimble holder, which I embroidered earlier. It will have a separate lid, which is lined with a tiny embroidered circle of fabric. So, this is a rather fiddly thing to assemble!

First, cut out the embroidered piece, leaving largish seam allowances (more than 3/8 inch), as I have found that these tiny 3D pieces can use up fabric more than you think, when you come to turning them inside out, etc.

Carolyn Pearce Strawberry Fayre thimble holder

The muslin backing fabric needs to be cut away from the top half of the embroidered piece on the back, to reduce bulk.

Carolyn Pearce Strawberry Fayre thimble holder

Fold the fabric into a tube, right sides together, and stitch carefully along the back seamline. I hand stitched mine.

Carolyn Pearce Strawberry Fayre thimble holder

Then flatten the seams out with your thumbnail, and turn the fabric to the right side. Now, I found that mine had a ‘gap’ with no embroidery. The instructions suggest that the embroidery should almost meet here, and that you only need to stitch a couple of lines and one more forget-me-not flower over the seam, to complete the pattern all the way round. I *almost* re-did the seam smaller, but if I had, the lid would not have fitted, so I think this is a mistake in the pattern. I decided to just have a gap in the embroidery, and never let people see the back!

Carolyn Pearce Strawberry Fayre thimble holder

Make a ring from template plastic, and stick it together with sticky tape.

Carolyn Pearce Strawberry Fayre thimble holder

Turn in the top edge of the fabric, and the lining, and tack the seam allowances down (separately). Do the lining with sewing thread that matches the fabric, as you won’t be able to remove this later. Slide  the plastic piece inside the tube so that the top edge of the circle aligns with the foldline.

Carolyn Pearce Strawberry Fayre thimble holder

Fold the lining in and down over the plastic ring, to make a tube with a stiffened bottom edge.

Carolyn Pearce Strawberry Fayre thimble holder

At this point, I decided to make the cord for my thimble holder in a different way from the instructions. Their instructions say to use ONE cord, that has the thimble holder on one end and the round pinwheel on the other end, and you’d eventually join the cord to the bottom tip of the heart etui part way along it. I didn’t like the sound of that, so I made a separate cord for each ‘dangly’. The thimble holder cord is 4 inches long from the neat end to the knot, and I stitched the knot inside the thimble holder at this point in the construction, hiding the knot between the lining and the embroidered fabric (so you don’t see it when you look into the holder later!). Make sure you secure it in place between the lining and fabric, then run a gathering thread round the top edge of the thimble holder fabric, pull it up firmly and secure by going back and forth across the gap, going through the cord as well.

Carolyn Pearce Strawberry Fayre thimble holder

Lastly, thread on a bead cap, cloisonne bead, and a gold bead to the cord, then knot the cord to hold them close to the holder. Stitch through the holes in the bead cap with matching thread to hold it down onto the fabric.

Carolyn Pearce Strawberry Fayre thimble holder

For the lid, cut out the fabric with 3/8 inch seam allowance, and run a gathering thread round the circle. Gather it up, over a plastic circle and a felt circle, for padding. Don’t overdo the padding – this is a very small piece. I found that the templates for the circles were far too large – carefully measure the diameter of the thimble holder at this point, and make your circle template whatever diameter it needs to be to fit. I had to reduce mine by 1/8 inch, which is a lot for such a small piece.

Carolyn Pearce Strawberry Fayre thimble holder

Do the same with the embroidered lid lining piece, which is a tiny circle barely 5/8 inch diameter. Slipstitch the two together, wrong sides facing, with strong sewing cotton.

Carolyn Pearce Strawberry Fayre thimble holder

Work beaded Knotted Pearl Stitch around the edge of the lid itself (not the smaller inner piece).

Carolyn Pearce Strawberry Fayre thimble holder

Start the beaded Knotted Pearl Stitch at the back, near the centre line. When you have gone all the way round, for the last couple of stitches, work through the fabric of the holder itself as well, to create a hinge for the lid. Stitch a green crystal bead on the centre front, and work a buttonhole loop on the edge of the lid to act as a closure.

Carolyn Pearce Strawberry Fayre thimble holder

This is it when it’s finished – about an inch and a half high, and very sweet! Carolyn Pearce’s thimble holders are always very ingenious, and a bit tricky to make, but so cute when they’re done!!!

Carolyn Pearce Strawberry Fayre thimble holder

Next time I’ll assemble the pinwheel….

~~~~~~~~~~~~~  ***  ~~~~~~~~~~~~~

~~~INFORMATION~~~

The Strawberry Fayre design, plus the complete list of materials, appears in Inspirations magazine number 95The publishers do sell a full materials pack  (not including the mother of pearl ruler though!), but it’s rather expensive, so if you can use your stash, and just fill in with bits and pieces, then so much the better! The magazine is published in Australia – if you live in the UK, as I do, it is cheaper to buy a back copy from Manor House Magazines, and save a lot on the shipping. 

EDIT: The materials pack from Inspirations, and the magazine from Manor House in the UK are not available any more as at March 2018 – I don’t know if any more stocks will be available now, unfortunately. The publishers may bring out a digital pattern pack later, which they sometimes do with popular projects from their magazines, but we’ll have to wait and see…..

To read about this project stitchalong from the beginning, start here. The post about which FABRIC to use is here. The post about the THREAD SUBSTITUTIONS that I made, plus WHERE TO BUY the threads and beads, etc., is here.

To look up all the posts in this series in the sidebar, see under the CATEGORIES list, under: Embroidery / Full size (others’ designs) / Strawberry Fayre heart etui, or use the SEARCH BOX at the top of the blog, and search for ‘Strawberry Fayre’ to get a list of all the posts (but it’s in reverse order, sorry!).

I’d be interested to see images of how your project is progressing – please email large, clear, well-focused images to mail@janetgranger.co.uk  Please bear in mind that any images sent may be used in this blog and/or social media such as Facebook or Pinterest.

~~~~~~~~~~~~~~~~~~~~~~~~~~~~~~~~~

Dollhouse Needlepoint newsletter sign-up invitation


Carolyn Pearce Strawberry Fayre heart etui 37: how to join panels with insertion stitch and attach the pincushion

I am currently stitching the Carolyn Pearce Strawberry Fayre heart etui as a stitchalong project. In this post I’ll explain how to join panels with insertion stitch on the etui, and attach the pincushion that I previously made. See the end of this post for all the information you’ll need to join in!

~~~~~~~~~~~~~  ***  ~~~~~~~~~~~~~

I’m now at a rather crucial part in this project – the four heart panels need to be joined together with insertion stitch, so that they make one whole piece, but not so tightly joined that the etui doesn’t open loosely and lay flat. No pressure, then!

This is what the etui looks like in Inspirations magazine issue 95, to give you an idea of what we’re aiming for (showing both the front and back):

Carolyn Pearce Strawberry Fayre how to do insertion stitch

It looks, from this picture, as if the insertion stitch starts off tightly done near the point, and gets wider further out, but that’s not actually the case. The stitch needs to be done to an even size all the way along the join. The stitch kind of ‘relaxes’ when it doesn’t need to stretch, as long as you don’t stitch it too tight in the first place – that’s the trick to doing this stitch.

In the instructions, it says to make a spacer from 1/8 inch thick card, to place between the two panels as you join them with insertion stitch. I reckon that if you only used a piece of card this thick, then the panels would buckle when you tried to close it up later, as the stitching would be too tight to work. Think about it – inside this etui, there are pockets on all heart panels that are lined, and beaded, and a pincushion 3/8 inch thick, and scissors and rulers in the pockets….that’s going to need more than 1/8 inch ‘give’ to work properly. So, I made my card spacer from four layers of mount board taped together, so that mine measured 3/8 inch in total. This worked for me. I used quilting bulldog clips to hold the two panels in place with the card spacer sandwiched in between. Make sure that the spacer is positioned right up to the edges of the two panels, as, if it slips further back, you’ll be stitching across a smaller gap than you intend, which would make the stitching too tight later.

Carolyn Pearce Strawberry Fayre how to do insertion stitch

You start the insertion stitch at the bottom tip of the heart shape each time, using Perle 8 (I used 4 feet of thread for each join, and it was plenty). Make sure you have secured the end well first. I spaced my stitches a quarter of an inch apart along each side – quite spacious really. If you do your stitches closer together, then start with more thread in your needle, as it is hard to join in new lengths part way along. I used a tapestry 26 needle, but a curved needle would have worked well too.

Insertion stitch is like doing buttonhole stitch, one stitch on each panel at a time, with a knot incorporated after each buttonhole. After doing a few stitches, and feeling like I needed a couple of extra hands to do it successfully, I devised this way of working – wedging the panels between my knees, and stitching away from myself:

Carolyn Pearce Strawberry Fayre how to do insertion stitch

After joining the front panel to one side panel, and then the back panel to one side panel, I positioned them like this (below) to join them into one piece. Make sure you keep checking which panel should be joined to the next one, and which way up they should face, as it’s easy to go wrong here:

Carolyn Pearce Strawberry Fayre how to do insertion stitch

Once all the insertion stitching had been completed, the etui did lay nice and flat, and relaxed (not tight). I’ve laid the spacer card in front of the etui here to show how much card was needed, and what the stitching looks like after it’s taken out.

Carolyn Pearce Strawberry Fayre how to do insertion stitch

This shows my etui opened out – you can see that the insertion stitch opens out gradually as it gets further from the centre point. It’s now that you stitch the pincushion into position. If you’d have done it earlier, it would have got in the way of doing the insertion stitch, and the spacer card wouldn’t have fitted properly. Work out exactly where you want the pincushion to be, alongside the tape measure pocket, then securely join a thread length to the panel under where the pincushion will sit, then run the needle behind the two buttonhole bars that you made, to hold the pincushion on. This gets a bit messy, but no-one will see!

Carolyn Pearce Strawberry Fayre how to do insertion stitch

This is what it looks like once the pincushion is in position, and the insertion stitch is finished.

Carolyn Pearce Strawberry Fayre how to do insertion stitch

Not much more to do, now!

~~~~~~~~~~~~~  ***  ~~~~~~~~~~~~~

~~~INFORMATION~~~

The Strawberry Fayre design, plus the complete list of materials, appears in Inspirations magazine number 95The publishers do sell a full materials pack  (not including the mother of pearl ruler though!), but it’s rather expensive, so if you can use your stash, and just fill in with bits and pieces, then so much the better! The magazine is published in Australia – if you live in the UK, as I do, it is cheaper to buy a back copy from Manor House Magazines, and save a lot on the shipping. 

EDIT: The materials pack from Inspirations, and the magazine from Manor House in the UK are not available any more as at March 2018 – I don’t know if any more stocks will be available now, unfortunately. The publishers may bring out a digital pattern pack later, which they sometimes do with popular projects from their magazines, but we’ll have to wait and see…..

To read about this project stitchalong from the beginning, start here. The post about which FABRIC to use is here. The post about the THREAD SUBSTITUTIONS that I made, plus WHERE TO BUY the threads and beads, etc., is here.

To look up all the posts in this series in the sidebar, see under the CATEGORIES list, under: Embroidery / Full size (others’ designs) / Strawberry Fayre heart etui, or use the SEARCH BOX at the top of the blog, and search for ‘Strawberry Fayre’ to get a list of all the posts (but it’s in reverse order, sorry!).

I’d be interested to see images of how your project is progressing – please email large, clear, well-focused images to mail@janetgranger.co.uk  Please bear in mind that any images sent may be used in this blog and/or social media such as Facebook or Pinterest.

~~~~~~~~~~~~~~~~~~~~~~~~~~~~~~~~~~~~~~~~

Are you interested in doll’s houses and stitching? Then why not visit my website, where you can buy doll’s house needlepoint kits to make all kinds of soft furnishings for one-twelfth scale dollhouses. There are over 280 kits to choose from, plus chart packs, fabric project packs, tutorials, and lots of eye candy to inspire you! Kits are available on 18 and 22 count canvas, 28 and 32 count evenweave, and 32 and 40 count silk gauze, so there’s something for everyone – from beginners to experts.

~~~~~~~~~~~~~~~~~~~~~~~~~~~~~~~~~~

Dollhouse Needlepoint newsletter sign-up invitation