Kitting up for my Gingerbread Village set

My fabric has arrived now for the three Gingerbread Village buildings that I am going to make – all from Victoria Sampler. The Victoria sampler website has suggested fabric layouts for each of the chart packs, so I printed those out, worked out how much I’d need altogether, and ordered the 28 count Cashel linen from Sew and So. I chose to have ‘Cognac’ shade, as the ‘Antique Almond’ shade suggested in the chart booklets is no longer available from Zweigart. I did wonder if  ‘Cognac’ might be too dark a shade, but when it arrived I was really pleased with it. Maybe in Canada their ‘real’ gingerbread (the edible type) is made paler than the English type, but I would expect gingerbread to be quite dark in colour, so the fabric I have chosen is ideal for an *English* gingerbread village! I have checked the shades of thread supplied in the Accessory Packs with the fabric I’m going to use, and nothing looks like it won’t work with the new fabric, so hopefully it will all go together well.

Village 6

The suggested fabric layouts said to tack the outline of each side or roof piece of each building on one piece of fabric in a long strip, and then attach the large piece of fabric in one go to a roller frame, then do all the stitching, before cutting the pieces apart at the end. I prefer to tack each small panel individually to a piece of cotton fabric, cut away the cotton from the back to reveal the linen, and then mount the cotton in a hoop, as I feel this gives me better access to do the stitching when I rest the hoop on my floor frame. So, I spent about an hour cutting up all my fabrics (Cognac, black for the church roof, and a deep blue for the Candy Cane Cottage roof), labelling them, then bagging them up.

Village 7

I have made thread sorters for each of the packs, by making slits spaced 3/4 of an inch apart horizontally on a strip of card, and labelling above each pair of slits – the relevant threads can then be stored on the card, and not get mixed up.

Village 8

All I’ve got to do now is decide which one I’ll make first.

~~~~~~~~~~~~~~~~~~~~~~~~~~~~~~~~~~

Dollhouse Needlepoint newsletter sign-up invitation


Beautiful mini stitching for doll’s houses by my customers

Sometimes, my customers send me photos of the things they have completed from my range of needlepoint kits for doll’s houses – and I always love seeing how they have used the stitching, as it’s so inspiring!

One of my best customers is Margaret, who owns several doll’s houses, and is always busy making something or other for her houses. Here are some pictures of her latest house, which is a model based on the ‘Chester Rows’. She says, “The new house is the Chester shops from the Dolls House Builder. I was born near Chester and used to frequently shop on the Chester “Rows” before I moved to South Wales. As you can imagine, I could not resist this house. It was my winter project during 2012/13, but I went at it as though my life depended upon it!

Margaret's newest twelfth scale doll's house - isn't it fantastic?
Margaret’s newest twelfth scale doll’s house – isn’t it fantastic?
An Arts and Crafts style room, with a carpet (called 'Karen') from my range of kits, stitched on 18 count canvas with Appleton's wools
An Arts and Crafts style room, with a carpet (called ‘Karen’) from my range of kits, stitched on 18 count canvas with Appleton’s wools
A doll's house scale solicitor's office - the carpet is called 'Isobel', and is one of the kits I produce. Margaret adapted the design to make her own cushions and chair seats.
A doll’s house scale solicitor’s office – the carpet is called ‘Isobel’, and is one of the kits I produce. Margaret adapted the design to make her own cushions and chair seats.

Dominique is from France, and sent me this picture of her doll’s house dining chair (available as a kit with both the wooden pieces, and the stitching, to make). Rather than stain the wood a dark brown, she chose to do a painted ‘shabby chic’ version….isn’t it lovely?!

gallery_dominiqueg2

More pictures from both of these talented stitchers can be found on the Customers’ Gallery page of my website, along with dozens more pictures from other stitchers – a great place to get inspiration for your next mini-stitching project.

~~~~~~~~~~~~~~~~~~~~~~~~~~~~~~~~~~

Dollhouse Needlepoint newsletter sign-up invitation


These will take a while….

Just before Christmas, I blogged about the Gingerbread Village series of 3D buildings that Thea Dueck has created for her business, Victoria Sampler (in CANADA – I won’t get it wrong and claim she’s in the USA, this time  🙂  ). Back then, I was just drooling over the series of village buildings, and saying how good they looked, and that one day….

The Gingerbread Stitching House, Gingerbread Church and Candy Cane Cottage chart booklets - all from Victoria Sampler
The Gingerbread Stitching House, Gingerbread Church and Candy Cane Cottage chart booklets – all from Victoria Sampler

I gave in a few days ago, and ordered the chart booklets and accessory packs for the three buildings that are available so far – the Gingerbread Stitching House, the Gingerbread Church, and Candy Cane Cottage.

Rather than order them direct from Victoria Sampler (and have to wait ages for them to get here because of Airmail, and pay huge shipping fees, and Customs Duty), I ordered them from Sew and So, and they came within two days, by courier, for just £1.99 p&p. That’s the kind of company I like buying from!

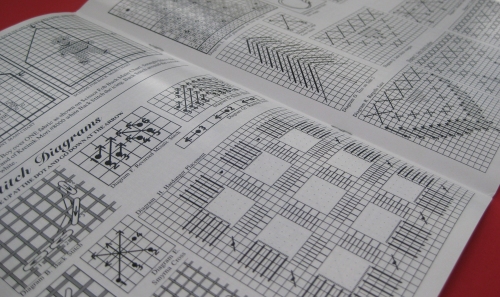
I have several of the Victoria Sampler chart booklets, and they’re always very well produced, using glossy paper, with large scale black and white symbol charts, detailed assembly instructions, and lots of photos. The spelling is sometimes a bit sloppy, but I can put up with that. It’s the designs that I love.

Assembly instructions are very detailed
There are clear diagrams for all the stitches used in the projects

These are more than just cross stitch designs. They are part of what Thea calls her ‘Beyond Cross Stitch’ range, meaning that they are suitable for people who have done some cross stitch, and would like to move on a little with their stitching skills, using other counted thread stitches alongside the cross stitch. All the stitches are clearly explained. It just makes these lovely buildings even more interesting to make.

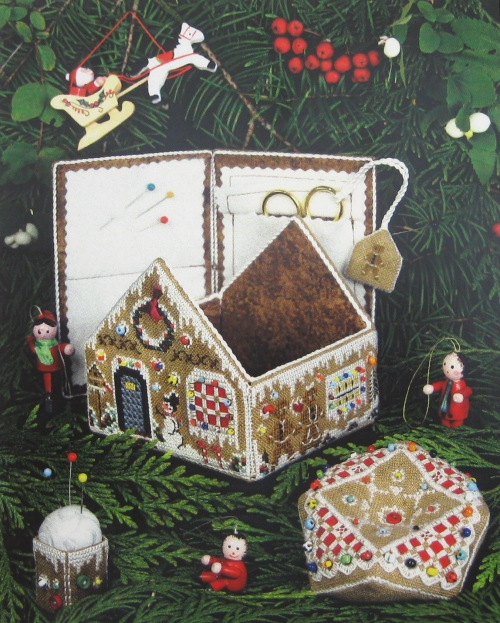
The Stitching House is an etui – the roof lifts off, so that a biscornu can be stored inside, along with scissors on a fob. The underside of the roof has felt pages to store needles, and the chimney is a pincushion. The other two buildings are just models, which don’t ‘do’ anything (except look cute).

The Gingerbread Stitching House is a lovely little etui

The thing that attracts me the most with these projects, though, is the ‘accessory packs’, that are sold alongside the chart booklets. You don’t have to buy them, but they have such yummy things in them, that they are hard to resist. For these three projects, each pack has tiny seed beads (size 11’s as well as weeny little 15’s), cute buttons, gold charms, silk ribbon, and any threads that you need to complete each project – and these are high end threads, too, such as Gloriana and Needlepoint Inc. silk.

This is the accessory pack for the Gingerbread Stitching House - look at all those tiny little beads & buttons!
This is the accessory pack for the Gingerbread Stitching House – look at all those tiny little beads & buttons!

Suggested fabrics are listed in the chart booklets, but, annoyingly, in the UK at least, the recommended ‘Antique Almond’ (a kind of medium brown) 28 count linen evenweave fabric has been discontinued by Zweigart. Sew and So say on their website that Zweigart’s ‘Dirty Linen’ shade  is a ‘close match’ to use instead, but I’ve already got some of that, and I reckon it’s completely different! Much greyer, and very drab-looking. Not gingerbready at all. So, I’ve chosen to use Zweigart’s 28 count linen shade ‘Cognac’, which is a strong rust brown shade. I’ve ordered a metre of the stuff now (enough for all three buildings), so if it’s the wrong colour when I get it, I’ll have a lot of it to use up in other projects.

I’ve got several things on the go at the moment, so these will have to wait a while, but I don’t think it’ll be long before I’ll start on them.

~~~~~~~~~~~~~~~~~~~~~~~~~~~~~~~~~~

Dollhouse Needlepoint newsletter sign-up invitation


Pincushion doll and thimble purse – 4

Well, this didn’t take too long. It’s finished already!

This is the picture from the front of the chart pack:

Stitch & Frame Shop image

And this is my version:

Pincushion doll - 11

I’m fairly pleased with how it’s turned out, although I must be feeling grumpy or something, as I haven’t got the feeling of achievement that I usually have when I finish a project. I think that the ‘niggly’ things with this project have outweighed the positives, and spoilt it a bit.

As you can see from the two pictures, it has come out very much like the one on the packet. However, I’ve had to do a lot of problem-solving with this one (or compromising, depending on your viewpoint), and some things haven’t come out as intended. The instructions, considering the cost of this chart pack, were too brief, in my opinion. A few more diagrams in places would have helped. Some of the measurements seem to have been decided after the original doll was put together, as they don’t work. And if there’s a ‘best way’ to achieve a certain stage successfully, maybe it would have been good to explain what that is, rather than vaguely stating what the next bit is, and leaving people to work it out? Like I said, I’m feeling grumpy!

I didn’t take any photos of the assembly of the heart-shaped purse – probably due to the grumpiness creeping up on me! It needs a heart embroidered on each of two pieces of linen, then attached (I laced them across the back – the instructions said to glue them, but I don’t like using glue on my embroidery) to a piece of Skirtex, then felt glued on (I oversewed the edges of the felt to the linen) to line them. Then you oversew the two sides together up to the curved top edges, to make the bag shape. The cord I was told to make, I found, was too short, when made to the length given in the instructions. But by then it was too late to make another one, as I’d cut my last piece of thread up to make an ‘almost too short’ piece of cording, and the remainder was only two feet long, so no use at all. The cord, once slip stitched to the bag around the sides and over the top to make a strap, was barely long enough to go over the doll’s head – compare the two photos above – my bag is far higher up on the doll than the one on the packet, which annoys me! The bag is for a thimble.

I decided against sticking huge hat pins into my pincushion doll, as I think she looks finished enough as she is.

I did count the hours this project took me: the main cross stitching on the skirt took 14 and a half hours, the beading took 1 hour 20 minutes, the bars for the cording took one and a half hours, and the assembly, including making the thimble purse, took five hours. So, 22 hours and 20 minutes altogether.

I feel that I need to do a project that has more creativity in it, now. Crewel, or goldwork, or something detailed….

~~~~~~~~~~~~~~~~~~~~~~~~~~~~~~~~~~

Dollhouse Needlepoint newsletter sign-up invitation