Well, after 46 blog posts and over a year’s stitching, the Home Sweet Home etui workbox that I have been making from Carolyn Pearce’s wonderful book is FINALLY FINISHED!!!!

This has been one mammoth project – I don’t think I’ve ever made such a detailed embroidered item. It’s not so much the embroidery – it’s not at all complex, stitching-wise – but the construction of the box seemed intimidating, when I started. That’s why I chose to make all the smalls first, in case I never got the courage to actually make the box itself 🙂

But having made all those smalls first, it did make the box much more ‘do-able’.

I’m really pleased with how it’s turned out. I can see me using this etui as my main one (I do actually have several etui sets, as they are my favourite thing to make).

Carolyn Pearce’s book really has to take the credit, though, as it is one of the best-written embroidery books I have ever owned. I am a stickler for details, and hate mistakes in books (either spelling mistakes, or instructions that simply don’t work out right!). But with this book, there simply aren’t any. Considering the complexity of the project, the number of diagrams, photos, etc., there is so much scope for one or two errors to slip through – but I didn’t find any.

With the final addition of the laying tool and stitch ripper set from Mace and Nairn shown below, my etui house is now completely finished.
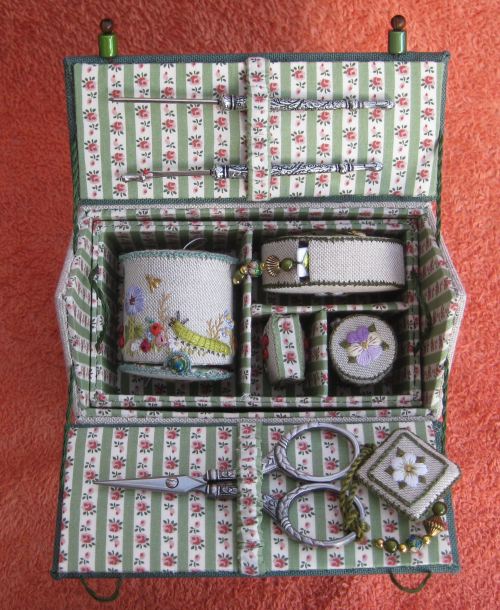
This is the etui set as the roof is first opened up:
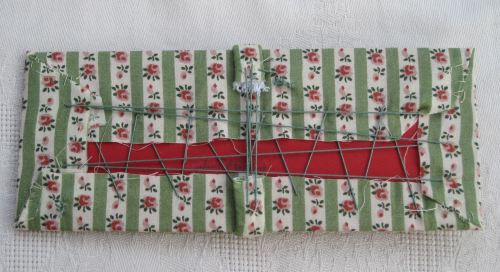
This is the space at the bottom of the box, once the inner tray is lifted out:

And here is the inner tray, filled with some of the smalls:

I have some tips, for those of you who are considering making this:
- Read the whole book first, to get a good feel for how the project ‘works’, and to familiarise yourself with where in the book the different instructions are located (for instance, the measurements for cutting all of the fabric pieces).
- Don’t use stripey fabric for the lining! It would have been far, far simpler to line the box if I had used a random floral or marbled small print cotton fabric, rather than the striped fabric that I chose. I chose it because Carolyn Pearce had used a striped fabric in the book, and it did look lovely, so I bought as near as I could get to what she had used. But then, all those stripes have to be matched up across all the box and lining pieces, and that can get very tricky. An all-over floral print, for example, wouldn’t need matching up.
- When assembling the dividers for the inner tray, Carolyn suggests using ‘a long needle’ to thread the quilting thread between the panels, but doesn’t say what length. I had a three inch long needle, and that wasn’t long enough. How many needles are longer than that?! I needed to catch the tip of the needle as it emerged, and pull it with pliers to get it out, as there wasn’t enough for me to grab hold of with my fingers. So, make sure you have a VERY LONG needle for that part (a blog reader suggested a dollmaking needle would be useful for this part)
- Measure every piece of mount board accurately before you cut it, then make a dry run before stitching panels together. Compare it to the pieces it will butt up against. My box ended up being about an eighth of an inch smaller all round than Carolyn’s, so every piece had to be adjusted as I went. Don’t skimp on this bit, or your box won’t fit together!
- Use your stash and save a fortune! Carolyn Pearce is well known for the large range of threads she uses in her projects, and that does make them very special, but often only a tiny piece of each colour is used. Save a lot by using what you have already.
- If you do substitute thread, make a note of when you do that. I didn’t, and it is noticeable (to me, anyway), that some of the green edging on the smalls is of different shades, and some of the flowers are not stitched with consistent shades across several of the pieces.
- Make sure that with the thimble holder, the round base piece fits INSIDE the tubular sides, and doesn’t sit on the ‘top’ of the tube. My thimble holder ended up a quarter of an inch longer than it should have been because I didn’t make the round base small enough to fit inside the tube, and I thought it wouldn’t matter – until I put it into the inner tray of the box, when I found that it was too long to lie down, as Carolyn’s one did, in the space allotted for it. It stands upright OK, but I can’t lie it down within its compartment in the box.
- For the tools that are kept in the roof (scissors, laying tool and stitch unpicker), lightweight ones are best, as otherwise they might pull the elastic straps out of shape, and slip sideways due to their weight, possibly pulling the lining fabric way from the mount board and distorting it.
- When you stitch the roof onto the box itself, don’t stitch too tightly, or the roof lid won’t close properly.
NB: IF YOU’D LIKE ANY QUESTIONS ANSWERED ABOUT THIS PROJECT, COMMENT BELOW, AND I’LL ADD THE ANSWERS HERE, TO KEEP EVERYTHING TOGETHER.
*****************************
MATERIALS USED:
There is a very detailed supplies list in Carolyn’s book, but not everything is available now (the book was published in 2012). I tried to keep a list of what I used, as I went along, which I’ve copied below. Occasionally, I changed my mind part way through, but this list should help you get started.
The fabric for the outside of the box is a cotton/linen blend of beige fabric which I bought in a local dressmaking shop a few years back. It is tightly woven, and quite flexible (not stiff at all). The striped cotton fabric was from the same shop, but it can still be found on Ebay, along with many other suitable small print cottons. I would actually recommend that you don’t use a striped fabric, though, as it’s a nightmare to match up the pattern.
The evenweave for the outer roof is 28 count Jobelan in Tartan Green ( a 19 x 27 fat quarter is plenty) from Sew and So.
The roof tile effect was stitched in Lizbeth Leaf Green Dark crochet cotton #20 thread number 20-676, from Fiveways Arts and Crafts online shop.
I used 2 x 7mm green nephrite cylinder beads for the chimneys (Ebay), plus 2 x 4mm round wooden beads for the chimney tops (my stash).
Oranges in the basket – Mill Hill number 02093 Opaque Autumn orange seed beads.
For the ‘pea wall’ of the house, I used Mill Hill Petite seed beads 42037 Green velvet, and the same beads for the beaded edging on some of the smalls.
2mm green sequins were very hard to find – I found some on Etsy.com in the end, in a bag of mixed colours and sizes, which I paid a lot for, and used less than 20!
The needlebook needed 4″ x 12″ of doctor flannel in ivory, which I bought from Australia (!), as nowhere in the UK had any. And I bought the last half a yard that they had. I hope you have better luck! Felt would make a good substitute, and be a lot cheaper.
The brass bee charms were found on Ebay – 12 for £2.70 (smaller ones than Carolyn suggests).
The tape measure itself I bought on Ebay for £1. The bee charm for the tape measure cover is from Susan Clarke Originals, and cost $4 plus shipping from the US, but I love it anyway, despite the cost!
The ‘Clover’ thread cutter was from Ebay.
The 8mm Cloisonne beads were from Magpie Jewellery – used for closures on several of the smalls, and on the tassels.
The 4.25 inch gunmetal colour scissors are made by Hemline, and were £7.50 from Ebay.
The stitch ripper and laying tool were a set from Mace and Nairn, and cost £17 for the two. A bit pricey, but beautiful 🙂
Here’s a list of the threads I used as substitutes for Carolyn’s list in her book – almost all are from my stash, and some were unlabelled, so I can’t tell you what I used (sorry!). Some are duplicated in the list, but appeared on different smalls, so I reckoned that was OK. Where DMC and Anchor are listed, I am referring to their stranded cotton range (usually using two strands each time):
A Petite Treasure braid PB02 gold
B Kreinik very fine braid 002V gold
C On The Surface ‘gunmetal’ shade metallic thread
D Kreinik very fine braid 002V gold
E Anchor 095 soft violet
F Anchor 097 antique violet
G Very fine wool from my stash – medium khaki green
H Anchor 1026 Light blush pink
I Silk N Colors 1037 Light purple blue
J Anchor 300 Light old gold
K Gloriana Silk ‘Fresh Snow’ white
L Silk N Colors 1055 Rose brown
M Silk N Colors 301 Medium rose brown
N Cascade 3830 Rose brown
O Dark green stranded cotton from my stash
P Silk N Colors 047 Olive green
Q Silk N Colors 047 Olive green (again)
R Anchor Light pinks 391, 1016 and 892 (instead of a variegated thread)
S Silk N Colors 1015 Rose pink
T Colourstreams Uluru silk
U – didn’t use a thread for this
V Colourstreams Uluru silk
W DMC Perle #5 935 dark avocado green
X – didn’t use a thread for this
Y Silk N Colors 110 Light khaki green
Z Anchor 1026 Light shell pink
AA Anchor 403 Black
AB Anchor 8581 Pewter grey
AC Rayon thread from my stash – Fuchsia pink
AD DMC 612 Taupe
AE DMC Ecru
AF Silk N Colors 1043 Cornflower blue
AG Anchor 0359 Chocolate
AH Fine wool Medium khaki green from my stash
AI Oliver Twists 004 Dark green grey
AJ DMC fine wool 8369 Medium green grey
AK Rajmahal rayon thread 104 Rosewood
AL Appletons crewel wool 185 soft brown
AM DMC fine wool 18224 Dark pecan
AN Didn’t use this shade
AO Didn’t use this shade
AP Appletons crewel wool 762 Rust brown
AQ Appletons crewel wool 181 and 183 blended
AR Silk N Colors 047 Olive green
AS Fine wool from my stash Medium dark khaki
AT Anchor Marlitt 894 red
AU Anchor 1041 Very dark pewter
AV Anchor 342 Light blue-violet
AW Cascade Colours 9325 Blue violet
AX Anchor 893 Red
AY Rajmahal 421 Green earth
AZ Stef Francis overdyed thread Mauve from my stash
BA Silk N Colors 063 Holly berry
BB Anchor 398 grey
BC Gentle Art Grecian gold 0460
BD Dark grey green stranded cotton from my stash
BE Fine wool light green from my stash
BF Rayon silk thread Light violet from my stash
BG Impressions 5123 Olive green
BH Anchor 1027 Antique mauve
BI Rayon thread from my stash Dark antique violet
BJ Lisbeth Leaf Green Dark crochet cotton #20 number 20-676
BK Kreinik very fine braid 002V
BEADS:
BL London Bead Company 601 Silver lined brown
BM London Bead Company 601 Silver lined brown (again)
BN Mill Hill 02093 Opaque autumn orange
BO Mill Hill 275 Pink
BP Green velvet seed beads from my stash
BQ Instead of using flower shaped beads, I stitched five French knots in a circle for these instead
BR 2mm green sequins, bought from Etsy
***************************
Here are my positive and negative (very few of those!) comments on the project, now it’s completed:
Positives:
The whole project is not as complex as it looks, and all aspects of the processes are very clearly explained.
The smalls can be made as one-offs, and would make great gifts.
The more unusual stitches are explained at the back of the book, with clear photos for each stage.
You learn new skills – I had never used a curved needle before, thinking it would be difficult. Now, I’d like to ladder stitch everything in sight, using a curved needle! The seams are virtually invisible.
There are unusual sewing accessories in this project that I haven’t come across before, such as the thread cutter cover and the emery block.
It’s simple to substitute threads from your stash, to make this project quite cheap to do. Most threads are only used in very small amounts, so leftovers from other projects can be substituted very successfully. I estimated that the whole project, including the fabric, scissors and laying tools, cost me less than £50, because I used stash threads most of the time.
It’s absolutely beautiful when it’s finished!
Negatives:
At the moment (June 2016), the book is out of print. There are plans to reprint the book – for up to date info, contact the publishers, who are also the publishers of Inspirations magazine in Australia (used to be Country Bumpkin – now called Create in Stitch).
Even though I bought the book as soon as it came out in 2012, some of the recommended supplies were already unavailable, even then. So, be prepared to make substitutions – although it’s a good reason to raid your stash for the odd piece of special thread!
The only part of the project that I found really tricky was the roof lining, where I was supposed to stretch fabric-covered elastic across another piece of fabric, and then lace it over a piece of mount board. I found this bit too difficult (unless you’re an octopus), and devised my own method.

So, if you’ve ever fancied making this, I would whole-heartedly suggest you give it a go!
*****************************
Book details:
Carolyn Pearce. “Home Sweet Home: an embroidered workbox”. 100 pages. Published by Country Bumpkin (publishers of Inspirations embroidery magazine) in 2012, in Australia. They are now called Create in Stitch, and the book is currently out of print, but may be reprinted during 2016. Contact them for updates. ISBN-10: 0980876702 ISBN-13: 978-0980876703.
***********************
Now I’m going to go and have a look at my stash, to choose the next thing to make……
~~~~~~~~~~~~~~~~~~~~~~~~~~~~~~~~~~