
My Sid Cooke shop kit (‘Number 1, High Street’) was gradually taking shape. The next stage was to find out how to add brick slips to my dollhouse shop kit, to make it look more realistic, and to complete the name board.
I needed to find a name for it first though – some people agonise for ages over the name for their shop. With me, I just thought that it was a dollhouse shop, and it would be selling tiny toys, so I’d call it ‘Tiny Toys’. Simples. Job done 🙂
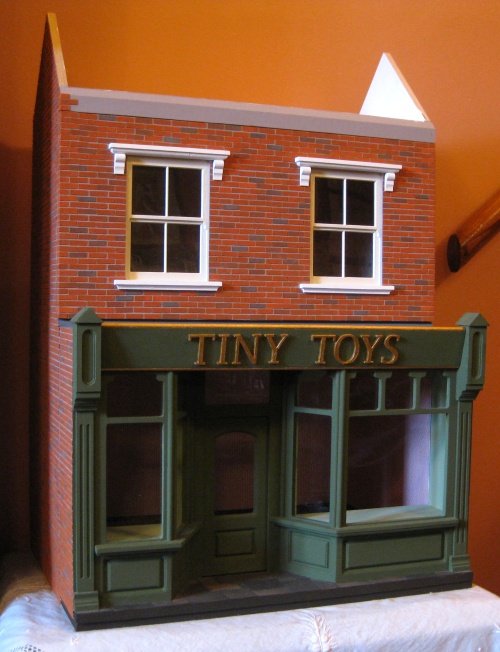
I bought some MDF letters on Ebay from Dolls House Direct for £4.50 for 8 letters, 30mm high, and painted them gold with Humbrol enamel paint. Then I stuck them on the signboard that had already been painted green when I did the rest of the lower front of the shop. The gold trims above and below the lettering were also painted with the Humbrol paint, and then the signboard was fixed in place with wood glue.

Then on to the brickwork….quite a mammoth task, and I was very aware that if I got this wrong, I’d have ruined it (so, no pressure, then!). I had researched online for hours to narrow down what kind of 1:12 bricks I wanted. Brick papers were discounted really early on, as they looked too childish and clunky for me – far too unrealistic. Real brick pieces looked nice, but were very expensive, and I’d worked out that I would need almost 4000 bricks for the front and both sides, so I needed to keep the cost down a bit. Real brick slips would have also made the house very heavy.
I eventually settled on these – brick slips made from card with a textured paint coating. They are called Versi-Slips from Richard Stacey, and are really easy to use. They vary in colour, so when you mix them up they look very realistic. You can get them in a yellow/buff mix, too. I needed four packets, plus a packet of the corner bricks, which are longer, and you fold them around the edges of the house to give a realistic-looking corner. Each packet cost me £12.95, so doing the brickwork for the whole of the exterior cost me around £55, including the corner brick slips.

I used PVA adhesive to stick the bricks to the plywood/MDF shell of the doll’s house. I used a cocktail stick to put a small amount on each card piece, held it for about ten seconds for the glue to penetrate a bit (or it just ran off), then placed it on the house wall, along a line that I made by sticking a metal ruler in place with masking tape for each course of bricks, moving it down one course at a time. This gave me a solid edge to work to. I found that most of the bricks stuck first time, but a few would curl up and need pressing down until they’d dried out a bit. I pencilled a guideline in centimetres near both wall ends, so that I was sure that I was completing each row perfectly straight. Between each course, I also checked the measurements from each end to the base line, to make doubly sure I was doing it right!

I’d decided before starting the brickwork that although it might be tricky (‘might’?! It was!!!) to apply the bricks around the window woodwork, it would look better later, as the brickwork would look more realistic than if I’d stuck the window trims on afterwards (as then they might look as if they were ‘floating’ on the brickwork). I had painted the window trims first with an undercoat and then two coats of off-white emulsion, then attached them to the house with contact adhesive. This image is upside-down because I found it easier to apply the bricks from this direction, with the house laying on its back 🙂
I found it easier to work from right to left each time. As you can see from this image, the corner bricks were added first, to work out the spacing for a few courses, before adding the bricks for the whole row. I didn’t do the corner bricks up the whole side in one go, though – just a couple of rows at a time was enough.

After sticking on each brick, and before the glue had dried completely, I scraped out any residue with a dental probe (every miniaturist has a dental probe in their toolbox, don’t they?!).

The brick slips were easily cut with scissors to fit around odd shapes, and ends of rows, as you can see here. The narrow strip already bricked that is showing towards the top of this image is the lift-off front for the upper storey, which I bricked first before I stuck the bricks on each side.

As I worked my way down each side, I had to make sure that the courses of bricks ‘flowed’ from the main body of the house on to the front lift-off piece, so I had to use masking tape to hold the two pieces together, and cut bricks in half on alternate rows to keep the pattern going.

After 35 hours in total of sticking on almost 4000 brick slips, it looked like this. I had carefully trimmed a lot of the brick slips up into the ‘triangle’ of the roof area, before realising that all of that would be hidden when I stuck the gable end boards in place, but never mind, *I* know it’ll always be neat under there!
You might also be able to catch a glimpse of the wallpapered interior in this shot – I’ll blog about that another time.

So, this is how it looked after all that brickwork. I’m very pleased with it, but to be honest, I wouldn’t choose to do brickwork like this again. Not sure yet how I’ll tackle the other shop kit that I’m planning – maybe I’ll choose an easier finish, like paint!
The next job is attaching and tiling the roof, which should make it look much more ‘solid’ 🙂
~~~~~~~~~~~~~~~~~~~~~~~~~~~~~~~~~~


Darling! I think it was worth all the work, but of course I wasn’t doing it.
Thanks – I think it was worth it too, now that it’s all done….but half way through, I wasn’t so sure!
Well done that woman! The Versi range are good aren’t they but they do blunt your scissors horribly 😉
Yes, they certainly do! It’s like cutting sandpaper – wears the blades out really quickly.
Unbelievable. I would love to walk right in!
Only if you’re six inches high….!
A time consuming venture to be sure but the results are well worth the time and patience required…lovely building facade! Thank you for sharing this technique…cheers, Alayne
Thanks – I’m very pleased with how it’s turned out 🙂
It was a lot of work, but the neat faced is spectacular!
Thank you!
Looks amazing. I only managed pebble dashing!
Pebble dashing sounds great. Would have been quicker, anyway!